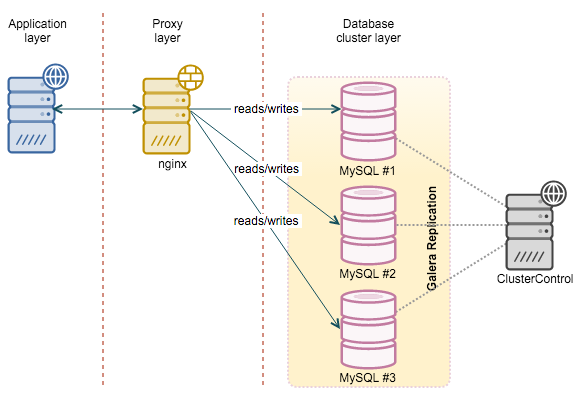
In a previous post, we discussed the error log as a source of diagnostic information for MySQL. We’ve shown examples of problems where the error log can help you diagnose issues with MySQL. This post focuses on the Galera Cluster error logs, so if you are currently using Galera, read on.
In a Galera cluster, whether you use MariaDB Cluster, Percona XtraDB Cluster or the Codership build, the MySQL error log is even more important. It gives you the same information as MySQL would, but you’ll also find in it information about Galera internals and replication. This data is crucial to understand the state of your cluster and to identify any issues which may impact the cluster’s ability to operate. In this post, we’ll try to make the Galera error log easier to understand.
![]()
This is the sixteenth installment in the ‘Become a MySQL DBA’ blog series. Our previous posts in the DBA series include:
- Understanding the MySQL error log,
- Optimizing Hints for faster queries,
- Using EXPLAIN to improve SQL Queries,
- Database Indexing,
- Deep Dive pt-query-digest,
- Analyzing SQL Workload with pt-query-digest,
- Query Tuning Process,
- Configuration Tuning,
- Live Migration using MySQL Replication,
- Database Upgrades,
- Replication Topology Changes,
- Schema Changes,
- High Availability,
- Backup & Restore,
- Monitoring & Trending.
Clean Galera startup
Let’s start by looking at what a clean startup of a Galera node looks like.
151028 14:28:50 mysqld_safe Starting mysqld daemon with databases from /var/lib/mysql
151028 14:28:50 mysqld_safe Skipping wsrep-recover for 98ed75de-7c05-11e5-9743-de4abc22bd11:11152 pair
151028 14:28:50 mysqld_safe Assigning 98ed75de-7c05-11e5-9743-de4abc22bd11:11152 to wsrep_start_position
What we can see here is Galera trying to understand the sequence number of the last writeset this node applied. It is found in grastate.dat file. In this particular case, shutdown was clean so all the needed data was found in that file making wsrep-recovery process unnecessary (i.e., the process of calculating the last writeset based on the data applied to the database). Galera sets the wsrep_start_position to the last applied writeset.
2015-10-28 14:28:50 0 [Warning] TIMESTAMP with implicit DEFAULT value is deprecated. Please use --explicit_defaults_for_timestamp server option (see documentation for more details).
2015-10-28 14:28:50 0 [Note] /usr/sbin/mysqld (mysqld 5.6.26-74.0-56) starting as process 553 ...
2015-10-28 14:28:50 553 [Note] WSREP: Read nil XID from storage engines, skipping position init
2015-10-28 14:28:50 553 [Note] WSREP: wsrep_load(): loading provider library '/usr/lib/libgalera_smm.so'
2015-10-28 14:28:50 553 [Note] WSREP: wsrep_load(): Galera 3.12.2(rf3e626d) by Codership Oy <info@codership.com> loaded successfully.
2015-10-28 14:28:50 553 [Note] WSREP: CRC-32C: using hardware acceleration.
2015-10-28 14:28:50 553 [Note] WSREP: Found saved state: 98ed75de-7c05-11e5-9743-de4abc22bd11:11152
Next we can see the WSREP library being loaded and, again, information about last state of the cluster before shutdown.
2015-10-28 14:28:50 553 [Note] WSREP: Passing config to GCS: base_dir = /var/lib/mysql/; base_host = 172.30.4.156; base_port = 4567; cert.log_conflicts = no; debug = no; evs.auto_evict = 0; evs.delay_margin = PT1S; evs.delayed_keep_period = PT30S; evs.inactive_check_period = PT0.5S; evs.inactive_timeout = PT15S; evs.join_retrans_period = PT1S; evs.max_install_timeouts = 3; evs.send_window = 4; evs.stats_report_period = PT1M; evs.suspect_timeout = PT5S; evs.user_send_window = 2; evs.view_forget_timeout = PT24H; gcache.dir = /var/lib/mysql/; gcache.keep_pages_count = 0; gcache.keep_pages_size = 0; gcache.mem_size = 0; gcache.name = /var/lib/mysql//galera.cache; gcache.page_size = 128M; gcache.size = 128M; gcs.fc_debug = 0; gcs.fc_factor = 1.0; gcs.fc_limit = 16; gcs.fc_master_slave = no; gcs.max_packet_size = 64500; gcs.max_throttle = 0.25; gcs.recv_q_hard_limit = 9223372036854775807; gcs.recv_q_soft_limit = 0.25; gcs.sync_donor = no; gmcast.segment = 0; gmcast.version = 0; pc.announce_timeout = PT3S; pc.checksum = false; pc.ignore_quorum =
This line covers all configuration related to Galera.
2015-10-28 14:28:50 553 [Note] WSREP: Service thread queue flushed.
2015-10-28 14:28:50 553 [Note] WSREP: Assign initial position for certification: 11152, protocol version: -1
2015-10-28 14:28:50 553 [Note] WSREP: wsrep_sst_grab()
2015-10-28 14:28:50 553 [Note] WSREP: Start replication
2015-10-28 14:28:50 553 [Note] WSREP: Setting initial position to 98ed75de-7c05-11e5-9743-de4abc22bd11:11152
2015-10-28 14:28:50 553 [Note] WSREP: protonet asio version 0
2015-10-28 14:28:50 553 [Note] WSREP: Using CRC-32C for message checksums.
2015-10-28 14:28:50 553 [Note] WSREP: backend: asio
Initialization process continues, WSREP replication has been started.
2015-10-28 14:28:50 553 [Warning] WSREP: access file(/var/lib/mysql//gvwstate.dat) failed(No such file or directory)
2015-10-28 14:28:50 553 [Note] WSREP: restore pc from disk failed
Those two lines above require a detailed comment. The file which is missing here, gvstate.dat, contains information about cluster state, as a given node sees it. You can find there the UUID of a node and other members of the cluster which are in the PRIMARY state (i.e., which are part of the cluster). In case of unexpected crash, this file will allow the node to understand the state of the cluster before it crashed. In case of a clean shutdown, the gvwstate.dat file is removed. That is why it cannot be found in our example.
2015-10-28 14:28:50 553 [Note] WSREP: GMCast version 0
2015-10-28 14:28:50 553 [Note] WSREP: (3506d410, 'tcp://0.0.0.0:4567') listening at tcp://0.0.0.0:4567
2015-10-28 14:28:50 553 [Note] WSREP: (3506d410, 'tcp://0.0.0.0:4567') multicast: , ttl: 1
2015-10-28 14:28:50 553 [Note] WSREP: EVS version 0
2015-10-28 14:28:50 553 [Note] WSREP: gcomm: connecting to group 'my_wsrep_cluster', peer '172.30.4.156:4567,172.30.4.191:4567,172.30.4.220:4567'
In this section, you will see the initial communication within the cluster - the node is trying to connect to the other members listed in wsrep_cluster_address variable. For Galera it’s enough to get in touch with one active member of the cluster - even if node “A” has contact only with node “B” but not “C”, “D” and “E”, node “B” will work as a relay and pass through the needed communication.
2015-10-28 14:28:50 553 [Warning] WSREP: (3506d410, 'tcp://0.0.0.0:4567') address 'tcp://172.30.4.156:4567' points to own listening address, blacklisting
2015-10-28 14:28:50 553 [Note] WSREP: (3506d410, 'tcp://0.0.0.0:4567') turning message relay requesting on, nonlive peers:
2015-10-28 14:28:50 553 [Note] WSREP: declaring 6221477d at tcp://172.30.4.191:4567 stable
2015-10-28 14:28:50 553 [Note] WSREP: declaring 78b22e70 at tcp://172.30.4.220:4567 stable
Here we can see results of the exchange of the communication. At first, it blacklists it’s own IP address. Then, as a result of a network exchange, the remaining two nodes of the cluster are found and declared ‘stable’. Please note the IDs used here - those Node IDs are used also in other places but here you can easily link them with the relevant IP address. Node ID can also be located in gvwstate.dat file (it’s a first segment of ‘my_uuid’) or by running “SHOW GLOBAL STATUS LIKE ‘wsrep_gcomm_uuid’”. Please keep in mind that UUID may change, for example, after a crash.
2015-10-28 14:28:50 553 [Note] WSREP: Node 6221477d state prim
2015-10-28 14:28:50 553 [Note] WSREP: view(view_id(PRIM,3506d410,5) memb {
    3506d410,0
    6221477d,0
    78b22e70,0
} joined {
} left {
} partitioned {
})
2015-10-28 14:28:50 553 [Note] WSREP: save pc into disk
2015-10-28 14:28:50 553 [Note] WSREP: gcomm: connected
As a result, the node managed to join the cluster - you can see that all IDs are listed as members of the cluster, cluster is in ‘Primary’ state. There are no nodes in ‘joined’ state, the cluster was not partitioned.
2015-10-28 14:28:50 553 [Note] WSREP: Changing maximum packet size to 64500, resulting msg size: 32636
2015-10-28 14:28:50 553 [Note] WSREP: Shifting CLOSED -> OPEN (TO: 0)
2015-10-28 14:28:50 553 [Note] WSREP: Opened channel 'my_wsrep_cluster'
2015-10-28 14:28:50 553 [Note] WSREP: Waiting for SST to complete.
2015-10-28 14:28:50 553 [Note] WSREP: New COMPONENT: primary = yes, bootstrap = no, my_idx = 0, memb_num = 3
2015-10-28 14:28:50 553 [Note] WSREP: STATE_EXCHANGE: sent state UUID: 355385f7-7d80-11e5-bb70-17166cef2a4d
2015-10-28 14:28:50 553 [Note] WSREP: STATE EXCHANGE: sent state msg: 355385f7-7d80-11e5-bb70-17166cef2a4d
2015-10-28 14:28:50 553 [Note] WSREP: STATE EXCHANGE: got state msg: 355385f7-7d80-11e5-bb70-17166cef2a4d from 0 (172.30.4.156)
2015-10-28 14:28:50 553 [Note] WSREP: STATE EXCHANGE: got state msg: 355385f7-7d80-11e5-bb70-17166cef2a4d from 1 (172.30.4.191)
2015-10-28 14:28:50 553 [Note] WSREP: STATE EXCHANGE: got state msg: 355385f7-7d80-11e5-bb70-17166cef2a4d from 2 (172.30.4.220)
2015-10-28 14:28:50 553 [Note] WSREP: Quorum results:
    version    = 3,
    component  = PRIMARY,
    conf_id    = 4,
    members    = 3/3 (joined/total),
    act_id     = 11152,
    last_appl. = -1,
    protocols  = 0/7/3 (gcs/repl/appl),
    group UUID = 98ed75de-7c05-11e5-9743-de4abc22bd11
Cluster members exchange information about their status and as a result we see a report on quorum calculation - cluster is in ‘Primary’ state with all three nodes joined.
2015-10-28 14:28:50 553 [Note] WSREP: Flow-control interval: [28, 28]
2015-10-28 14:28:50 553 [Note] WSREP: Restored state OPEN -> JOINED (11152)
2015-10-28 14:28:50 553 [Note] WSREP: New cluster view: global state: 98ed75de-7c05-11e5-9743-de4abc22bd11:11152, view# 5: Primary, number of nodes: 3, my index: 0, protocol version 3
2015-10-28 14:28:50 553 [Note] WSREP: SST complete, seqno: 11152
2015-10-28 14:28:50 553 [Note] WSREP: Member 0.0 (172.30.4.156) synced with group.
2015-10-28 14:28:50 553 [Note] WSREP: Shifting JOINED -> SYNCED (TO: 11152)
Those few lines above are bit misleading - there was no SST performed as the node was synced with the cluster. In short, at this very moment, the cluster is up and our node is synced with the other cluster members.
2015-10-28 14:28:50 553 [Warning] option 'innodb-buffer-pool-instances': signed value -1 adjusted to 0
2015-10-28 14:28:50 553 [Note] Plugin 'FEDERATED' is disabled.
2015-10-28 14:28:50 553 [Note] InnoDB: Using atomics to ref count buffer pool pages
2015-10-28 14:28:50 553 [Note] InnoDB: The InnoDB memory heap is disabled
2015-10-28 14:28:50 553 [Note] InnoDB: Mutexes and rw_locks use GCC atomic builtins

...

2015-10-28 14:28:52 553 [Note] /usr/sbin/mysqld: ready for connections.
Version: '5.6.26-74.0-56'  socket: '/var/lib/mysql/mysql.sock'  port: 3306  Percona XtraDB Cluster (GPL), Release rel74.0, Revision 624ef81, WSREP version 25.12, wsrep_25.12
Finally, MySQL startup process is coming to it’s end - MySQL is up and running, ready to handle connections.
As you can see, in the error log, during the clean start, we can see a lot of information. We can see how a node sees the cluster, we can see information about quorum calculation, we can see IDs and IP addresses of other nodes in the cluster. This give us great info about the cluster state - what nodes were up, were there any connectivity issues? Information about Galera configuration is also very useful - my.cnf may have been changed in the meantime, runtime configuration - the same. Yet, we can still check how exactly Galera was configured at the time of the startup. It may comes handy when dealing with misconfigurations.
Galera node - IST process
Ok, so we covered a regular startup - when a node is up to date with the cluster. What about when a node is not up to date? There are two options - if the donor has all the needed writesets stored in its gcache, Incremental State Transfer (IST) can be performed. If not, State Snapshot Transfer (SST) will be executed and it involves copying all data from the donor to the joining node. This time, we are looking at the node joining/synchronization using IST. To make it easier to read, we are going to remove some of the log entries which didn’t change compared to the clean startup we discussed earlier.
2015-10-28 16:36:50 0 [Warning] TIMESTAMP with implicit DEFAULT value is deprecated. Please use --explicit_defaults_for_timestamp server option (see documentation for more details).
2015-10-28 16:36:50 0 [Note] /usr/sbin/mysqld (mysqld 5.6.26-74.0-56) starting as process 10144 ...

...

2015-10-28 16:36:50 10144 [Note] WSREP: Found saved state: 98ed75de-7c05-11e5-9743-de4abc22bd11:-1
Ok, MySQL started and after initialization, Galera located the saved state with ‘-1’ as a writeset sequence number. It means that the node didn’t shutdown cleanly and the correct state wasn’t written in grastate.dat file.
...

2015-10-28 16:36:50 10144 [Note] WSREP: Start replication
2015-10-28 16:36:50 10144 [Note] WSREP: Setting initial position to 98ed75de-7c05-11e5-9743-de4abc22bd11:11152

Even though grastate.dat file didn’t contain sequence number, Galera can calculate it on it’s own and setup the initial position accordingly.

...

2015-10-28 16:36:50 10144 [Note] WSREP: gcomm: connecting to group 'my_wsrep_cluster', peer '172.30.4.156:4567,172.30.4.191:4567,172.30.4.220:4567'
2015-10-28 16:36:50 10144 [Warning] WSREP: (16ca37d4, 'tcp://0.0.0.0:4567') address 'tcp://172.30.4.191:4567' points to own listening address, blacklisting
2015-10-28 16:36:50 10144 [Note] WSREP: (16ca37d4, 'tcp://0.0.0.0:4567') turning message relay requesting on, nonlive peers:
2015-10-28 16:36:51 10144 [Note] WSREP: declaring 3506d410 at tcp://172.30.4.156:4567 stable
2015-10-28 16:36:51 10144 [Note] WSREP: declaring 78b22e70 at tcp://172.30.4.220:4567 stable
2015-10-28 16:36:51 10144 [Note] WSREP: Node 3506d410 state prim
2015-10-28 16:36:51 10144 [Note] WSREP: view(view_id(PRIM,16ca37d4,8) memb {
    16ca37d4,0
    3506d410,0
    78b22e70,0
} joined {
} left {
} partitioned {
})
Similar to the clean startup, the Galera nodes had some communication and decided on the state of the cluster. In this case, all three nodes were up and the cluster was formed.
2015-10-28 16:36:51 10144 [Note] WSREP: save pc into disk
2015-10-28 16:36:51 10144 [Note] WSREP: Waiting for SST to complete.
2015-10-28 16:36:51 10144 [Note] WSREP: New COMPONENT: primary = yes, bootstrap = no, my_idx = 0, memb_num = 3
2015-10-28 16:36:51 10144 [Note] WSREP: STATE_EXCHANGE: sent state UUID: 17633a80-7d92-11e5-8bdc-f6091df00f00
2015-10-28 16:36:51 10144 [Note] WSREP: STATE EXCHANGE: sent state msg: 17633a80-7d92-11e5-8bdc-f6091df00f00
2015-10-28 16:36:51 10144 [Note] WSREP: STATE EXCHANGE: got state msg: 17633a80-7d92-11e5-8bdc-f6091df00f00 from 0 (172.30.4.191)
2015-10-28 16:36:51 10144 [Note] WSREP: STATE EXCHANGE: got state msg: 17633a80-7d92-11e5-8bdc-f6091df00f00 from 1 (172.30.4.156)
2015-10-28 16:36:51 10144 [Note] WSREP: STATE EXCHANGE: got state msg: 17633a80-7d92-11e5-8bdc-f6091df00f00 from 2 (172.30.4.220)
2015-10-28 16:36:51 10144 [Note] WSREP: Quorum results:
    version    = 3,
    component  = PRIMARY,
    conf_id    = 6,
    members    = 2/3 (joined/total),
    act_id     = 31382,
    last_appl. = -1,
    protocols  = 0/7/3 (gcs/repl/appl),
    group UUID = 98ed75de-7c05-11e5-9743-de4abc22bd11
Again, communication exchange happens and quorum calculation is performed. This time you can see that three members were detected and only two of them joined. This is something we expect - one node is not synced with the cluster.
2015-10-28 16:36:51 10144 [Note] WSREP: Flow-control interval: [28, 28]
2015-10-28 16:36:51 10144 [Note] WSREP: Shifting OPEN -> PRIMARY (TO: 31382)
2015-10-28 16:36:51 10144 [Note] WSREP: State transfer required:
    Group state: 98ed75de-7c05-11e5-9743-de4abc22bd11:31382
    Local state: 98ed75de-7c05-11e5-9743-de4abc22bd11:11152
State transfer was deemed necessary because the local node is not up to date with the applied writesets.
2015-10-28 16:36:51 10144 [Note] WSREP: New cluster view: global state: 98ed75de-7c05-11e5-9743-de4abc22bd11:31382, view# 7: Primary, number of nodes: 3, my index: 0, protocol version 3
2015-10-28 16:36:51 10144 [Warning] WSREP: Gap in state sequence. Need state transfer.
2015-10-28 16:36:51 10144 [Note] WSREP: Running: 'wsrep_sst_xtrabackup-v2 --role 'joiner' --address '172.30.4.191' --datadir '/var/lib/mysql/' --defaults-file '/etc/mysql/my.cnf' --defaults-group-suffix '' --parent '10144''''
WSREP_SST: [INFO] Streaming with xbstream (20151028 16:36:52.039)
WSREP_SST: [INFO] Using socat as streamer (20151028 16:36:52.041)
State transfer is performed using xtrabackup, this is true for both IST and SST (if xtrabackup is configured as SST method). Both xbstream and socat binaries are required for IST (and SST) to execute. It may happen that socat is not installed on the system. In such case, the node won’t be able to join the cluster.
WSREP_SST: [INFO] Evaluating timeout -k 110 100 socat -u TCP-LISTEN:4444,reuseaddr stdio | xbstream -x; RC=( ${PIPESTATUS[@]} ) (20151028 16:36:52.132)
2015-10-28 16:36:52 10144 [Note] WSREP: Prepared SST request: xtrabackup-v2|172.30.4.191:4444/xtrabackup_sst//1
2015-10-28 16:36:52 10144 [Note] WSREP: wsrep_notify_cmd is not defined, skipping notification.
2015-10-28 16:36:52 10144 [Note] WSREP: REPL Protocols: 7 (3, 2)
2015-10-28 16:36:52 10144 [Note] WSREP: Service thread queue flushed.
2015-10-28 16:36:52 10144 [Note] WSREP: Assign initial position for certification: 31382, protocol version: 3
2015-10-28 16:36:52 10144 [Note] WSREP: Service thread queue flushed.
2015-10-28 16:36:52 10144 [Note] WSREP: Prepared IST receiver, listening at: tcp://172.30.4.191:4568
2015-10-28 16:36:52 10144 [Note] WSREP: Member 0.0 (172.30.4.191) requested state transfer from '*any*'. Selected 1.0 (172.30.4.156)(SYNCED) as donor.
2015-10-28 16:36:52 10144 [Note] WSREP: Shifting PRIMARY -> JOINER (TO: 31389)
This stage covers state transfer - as you can see, the donor is selected. In our case, it is 172.30.4.156. This is pretty important information, especially when SST is executed - donors will run xtrabackup to move the data and they will log the progress in innobackup.backup.log file in the MySQL data directory. Different network issues may also cause problems with state transfer - it’s good to check which node was a donor even if only to check if there are any errors on the donor’s side.
2015-10-28 16:36:52 10144 [Note] WSREP: Requesting state transfer: success, donor: 1
2015-10-28 16:36:53 10144 [Note] WSREP: 1.0 (172.30.4.156): State transfer to 0.0 (172.30.4.191) complete.
2015-10-28 16:36:53 10144 [Note] WSREP: Member 1.0 (172.30.4.156) synced with group.
WSREP_SST: [INFO] xtrabackup_ist received from donor: Running IST (20151028 16:36:53.159)
WSREP_SST: [INFO] Galera co-ords from recovery: 98ed75de-7c05-11e5-9743-de4abc22bd11:11152 (20151028 16:36:53.162)
WSREP_SST: [INFO] Total time on joiner: 0 seconds (20151028 16:36:53.164)
WSREP_SST: [INFO] Removing the sst_in_progress file (20151028 16:36:53.166)
2015-10-28 16:36:53 10144 [Note] WSREP: SST complete, seqno: 11152
2015-10-28 16:36:53 10144 [Warning] option 'innodb-buffer-pool-instances': signed value -1 adjusted to 0
2015-10-28 16:36:53 10144 [Note] Plugin 'FEDERATED' is disabled.
2015-10-28 16:36:53 10144 [Note] InnoDB: Using atomics to ref count buffer pool pages

...

2015-10-28 16:36:55 10144 [Note] WSREP: Signalling provider to continue.
2015-10-28 16:36:55 10144 [Note] WSREP: Initialized wsrep sidno 1
2015-10-28 16:36:55 10144 [Note] WSREP: SST received: 98ed75de-7c05-11e5-9743-de4abc22bd11:11152
2015-10-28 16:36:55 10144 [Note] /usr/sbin/mysqld: ready for connections.
Version: '5.6.26-74.0-56'  socket: '/var/lib/mysql/mysql.sock'  port: 3306  Percona XtraDB Cluster (GPL), Release rel74.0, Revision 624ef81, WSREP version 25.12, wsrep_25.12
2015-10-28 16:36:55 10144 [Note] WSREP: Receiving IST: 20230 writesets, seqnos 11152-31382
2015-10-28 16:40:18 10144 [Note] WSREP: IST received: 98ed75de-7c05-11e5-9743-de4abc22bd11:31382
2015-10-28 16:40:18 10144 [Note] WSREP: 0.0 (172.30.4.191): State transfer from 1.0 (172.30.4.156) complete.
In this section, among others, we can see IST being performed and 20k writesets were transferred from the donor to the joining node.
2015-10-28 16:40:18 10144 [Note] WSREP: Shifting JOINER -> JOINED (TO: 34851)
At this point, the node applied all writesets sent by the donor and it switched to ‘Joined’ state. It’s not yet synced because there are remaining writesets (applied by the cluster while IST was performed) to be applied. This is actually something very important to keep in mind - when a node is a ‘Joiner’, it’s applying writesets as fast as possible, without any interruption to the cluster. Once a node switches to ‘Joined’ state, it may send flow control messages. This is particularly visible when there are lots of writesets to be sent via IST. Let’s say it took 2h to apply them on a joining node. This means it still has to apply 2h worth of traffic - and it can send flow control messages in the meantime. Given that the‘Joined’ node is significantly lagging behind (2h), it will definitely send flow control - for the duration of the time needed to apply those 2h worth of traffic, the cluster will run with degraded performance.
2015-10-28 16:42:30 10144 [Note] WSREP: Member 0.0 (172.30.4.191) synced with group.
2015-10-28 16:42:30 10144 [Note] WSREP: Shifting JOINED -> SYNCED (TO: 36402)
2015-10-28 16:42:31 10144 [Note] WSREP: Synchronized with group, ready for connections
2015-10-28 16:42:31 10144 [Note] WSREP: wsrep_notify_cmd is not defined, skipping notification.
Finally, the node caught up on the writeset replication and synced with the cluster.
Galera SST process
In the previous part, we covered IST process from the error log point of view. One more important and frequent process is left - State Snapshot Transfer (SST).
151102 15:39:10 mysqld_safe Starting mysqld daemon with databases from /var/lib/mysql
151102 15:39:10 mysqld_safe Skipping wsrep-recover for 98ed75de-7c05-11e5-9743-de4abc22bd11:71174 pair
151102 15:39:10 mysqld_safe Assigning 98ed75de-7c05-11e5-9743-de4abc22bd11:71174 to wsrep_start_position

...

2015-11-02 15:39:11 1890 [Note] WSREP: Quorum results:
    version    = 3,
    component  = PRIMARY,
    conf_id    = 10,
    members    = 2/3 (joined/total),
    act_id     = 97896,
    last_appl. = -1,
    protocols  = 0/7/3 (gcs/repl/appl),
    group UUID = 98ed75de-7c05-11e5-9743-de4abc22bd11
2015-11-02 15:39:11 1890 [Note] WSREP: Flow-control interval: [28, 28]
2015-11-02 15:39:11 1890 [Note] WSREP: Shifting OPEN -> PRIMARY (TO: 97896)
2015-11-02 15:39:11 1890 [Note] WSREP: State transfer required:
    Group state: 98ed75de-7c05-11e5-9743-de4abc22bd11:97896
    Local state: 98ed75de-7c05-11e5-9743-de4abc22bd11:71174
2015-11-02 15:39:11 1890 [Note] WSREP: New cluster view: global state: 98ed75de-7c05-11e5-9743-de4abc22bd11:97896, view# 11: Primary, number of nodes: 3, my index: 2, protocol version 3
2015-11-02 15:39:11 1890 [Warning] WSREP: Gap in state sequence. Need state transfer.
2015-11-02 15:39:11 1890 [Note] WSREP: Running: 'wsrep_sst_xtrabackup-v2 --role 'joiner' --address '172.30.4.191' --datadir '/var/lib/mysql/' --defaults-file '/etc/mysql/my.cnf' --defaults-group-suffix '' --parent '1890''''
WSREP_SST: [INFO] Streaming with xbstream (20151102 15:39:11.812)
WSREP_SST: [INFO] Using socat as streamer (20151102 15:39:11.814)
WSREP_SST: [INFO] Evaluating timeout -k 110 100 socat -u TCP-LISTEN:4444,reuseaddr stdio | xbstream -x; RC=( ${PIPESTATUS[@]} ) (20151102 15:39:11.908)
2015-11-02 15:39:12 1890 [Note] WSREP: Prepared SST request: xtrabackup-v2|172.30.4.191:4444/xtrabackup_sst//1
2015-11-02 15:39:12 1890 [Note] WSREP: wsrep_notify_cmd is not defined, skipping notification.
2015-11-02 15:39:12 1890 [Note] WSREP: REPL Protocols: 7 (3, 2)
2015-11-02 15:39:12 1890 [Note] WSREP: Service thread queue flushed.
2015-11-02 15:39:12 1890 [Note] WSREP: Assign initial position for certification: 97896, protocol version: 3
2015-11-02 15:39:12 1890 [Note] WSREP: Service thread queue flushed.
2015-11-02 15:39:12 1890 [Note] WSREP: Prepared IST receiver, listening at: tcp://172.30.4.191:4568
2015-11-02 15:39:12 1890 [Note] WSREP: Member 2.0 (172.30.4.191) requested state transfer from '*any*'. Selected 0.0 (172.30.4.220)(SYNCED) as donor.
2015-11-02 15:39:12 1890 [Note] WSREP: Shifting PRIMARY -> JOINER (TO: 98007)
2015-11-02 15:39:12 1890 [Note] WSREP: Requesting state transfer: success, donor: 0
Until this line, everything looks exactly like with Incremental State Transfer (IST). There was a gap in the sequence between joining node and the rest of the cluster. SST was deemed necessary because the required writeset (71174) wasn’t available in the donor’s gcache.
WSREP_SST: [INFO] Proceeding with SST (20151102 15:39:13.070)
WSREP_SST: [INFO] Evaluating socat -u TCP-LISTEN:4444,reuseaddr stdio | xbstream -x; RC=( ${PIPESTATUS[@]} ) (20151102 15:39:13.071)
WSREP_SST: [INFO] Cleaning the existing datadir and innodb-data/log directories (20151102 15:39:13.093)
removed ‘/var/lib/mysql/DB187/t1.ibd’
removed ‘/var/lib/mysql/DB187/t2.ibd’
removed ‘/var/lib/mysql/DB187/t3.ibd’
SST basically copies data from a donor to the joining node. For this to work, the current contents of the data directory have to be removed - the SST process takes care of it and you can follow the progress in the error log, as can be seen above.
...

removed directory: ‘/var/lib/mysql/DBx236’
WSREP_SST: [INFO] Waiting for SST streaming to complete! (20151102 15:39:30.349)
2015-11-02 15:42:32 1890 [Note] WSREP: Created page /var/lib/mysql/gcache.page.000000 of size 134217728 bytes
2015-11-02 15:48:56 1890 [Note] WSREP: Created page /var/lib/mysql/gcache.page.000001 of size 134217728 bytes
2015-11-02 15:54:59 1890 [Note] WSREP: Created page /var/lib/mysql/gcache.page.000002 of size 134217728 bytes
2015-11-02 16:00:45 1890 [Note] WSREP: Created page /var/lib/mysql/gcache.page.000003 of size 134217728 bytes
2015-11-02 16:06:21 1890 [Note] WSREP: Created page /var/lib/mysql/gcache.page.000004 of size 134217728 bytes
2015-11-02 16:09:32 1890 [Note] WSREP: 0.0 (172.30.4.220): State transfer to 2.0 (172.30.4.191) complete.
2015-11-02 16:09:32 1890 [Note] WSREP: Member 0.0 (172.30.4.220) synced with group.
The SST process takes some time, depending on the time needed to copy the data. For the duration of the SST, the joining node caches writesets in gcache and, if in-memory gcache is not large enough, on-disk gcache files are used. Please note that at this point, in the last two lines, we can see information about the donor finishing the SST and getting back in sync with the rest of the cluster.
WSREP_SST: [INFO] Preparing the backup at /var/lib/mysql//.sst (20151102 16:09:32.187)
WSREP_SST: [INFO] Evaluating innobackupex --no-version-check  --apply-log $rebuildcmd ${DATA} &>${DATA}/innobackup.prepare.log (20151102 16:09:32.188)
2015-11-02 16:12:39 1890 [Note] WSREP: Created page /var/lib/mysql/gcache.page.000005 of size 134217728 bytes
2015-11-02 16:20:52 1890 [Note] WSREP: Created page /var/lib/mysql/gcache.page.000006 of size 134217728 bytes
In this case, the joiner use xtrabackup as the SST method therefore the ‘prepare’ phase has to be completed.
WSREP_SST: [INFO] Moving the backup to /var/lib/mysql/ (20151102 16:26:01.062)
WSREP_SST: [INFO] Evaluating innobackupex --defaults-file=/etc/mysql/my.cnf  --defaults-group=mysqld --no-version-check   --move-back --force-non-empty-directories ${DATA} &>${DATA}/innobackup.move.log (20151102 16:26:01.064)
WSREP_SST: [INFO] Move successful, removing /var/lib/mysql//.sst (20151102 16:26:14.600)
Last phase is to copy back files from the temporary directory to MySQL data directory. The rest of the process is similar to what we discussed earlier. The node initializes all plugins and InnoDB, and MySQL gets ready to handle connections. Once that’s done, it applies the remaining writesets stored in gcache.
2015-11-02 16:27:06 1890 [Note] WSREP: Deleted page /var/lib/mysql/gcache.page.000000
2015-11-02 16:27:08 1890 [Note] WSREP: Deleted page /var/lib/mysql/gcache.page.000001
2015-11-02 16:27:11 1890 [Note] WSREP: Deleted page /var/lib/mysql/gcache.page.000002
2015-11-02 16:27:15 1890 [Note] WSREP: Deleted page /var/lib/mysql/gcache.page.000003
2015-11-02 16:28:11 1890 [Note] WSREP: Deleted page /var/lib/mysql/gcache.page.000004
2015-11-02 16:28:56 1890 [Note] WSREP: Deleted page /var/lib/mysql/gcache.page.000005
2015-11-02 16:29:17 1890 [Note] WSREP: Deleted page /var/lib/mysql/gcache.page.000006
2015-11-02 16:29:24 1890 [Note] WSREP: Member 2.0 (172.30.4.191) synced with group.
2015-11-02 16:29:24 1890 [Note] WSREP: Shifting JOINED -> SYNCED (TO: 214214)
2015-11-02 16:29:24 1890 [Note] WSREP: Synchronized with group, ready for connections
2015-11-02 16:29:24 1890 [Note] WSREP: wsrep_notify_cmd is not defined, skipping notification.
After all writesets were applied, on-disk gcache files are deleted and the node finally syncs up with the cluster.
Xtrabackup logs for SST
The SST process (if you use xtrabackup as the SST method), as you may have noticed, consists of three stages - streaming data to joiner, applying logs on the joiner and moving data from temporary directory to the final location in MySQL data directory. To have a complete view of the process, we need to mention some additional log files related to those three stages of the SST. You can find them in MySQL data directory or in the temporary directory Galera uses to move the data to the joiner.
First of them (in order of appearance) is innobackup.backup.log - a file created on the donor host which consists of all the logs from xtrabackup process which is executed to stream the data from donor to joiner. This file can be very useful in dealing with any type of SST issue. In the next blog post, we will show how you can use it to identify the problem.
Another file located either in MySQL data directory (e.g., /var/lib/mysql) or .sst temporary subdirectory (e.g., /var/lib/mysql/.sst) is innobackup.prepare.log. This file contains logs related to ‘apply log’ phase. In this stage xtrabackup applies transaction logs to tablespaces (ibd files) copied from the donor. It may happen that InnoDB data is corrupted and, even though it was possible to stream the data from donor to joiner, it’s not possible to apply transactions from the redo log. Such errors will be logged in this file.
The last one is innobackup.move.log - it contains logs of the ‘move’ stage in which xtrabackup move files from temporary (.sst) directory to the final location in MySQL data directory.
In the next post, we’ll go through real life examples of errors which may impact your Galera Cluster. We will cover a wide range of issues that you can experience in production, and how to deal with them. For that, it is important to know what exactly you should expect in logs from a ‘normal’ system state - now that you know what normal looks like, it will much easier to understand what’s not normal :-)