Quantcast
Channel: Severalnines - MariaDB
Viewing all 365 articles
Browse latest View live

Planets9s - Download our whitepaper on automation & management of open source databases

$
0
0

Welcome to Planets9s, a weekly communication on all the latest resources and technologies that we create at Severalnines around automation and management of open source databases. I trust that these resources will be useful to you and would love to get your feedback on them.

Download our whitepaper on automation & management of open source databases

Whether you’re looking into ways to automate various aspects of administering your open source databases or to take better control of your data, this whitepaper covers what tools to build (or buy) for effective management, database deployment options beyond Chef or Puppet, important aspects of monitoring and managing open source database infrastructures and how ClusterControl enables a systematic approach to their operations.

Click here to download the whitepaper

Managing MySQL Replication for High Availability

If you’re looking into deploying a MySQL Replication topology or maintaining one, you’ll find great insight in this webinar replay about topology changes, managing slave lag, promoting slaves, repairing replication issues, fixing broken nodes, managing schema changes and scheduling backups. Multi-datacenter replication is also covered.

Get access to the webinar replay

High availability read-write splitting with php-mysqlnd, MySQL Replication and HAProxy

MySQL Replication is used in a variety of use cases - scale out read workloads, provide high availability and geographic redundancy, offload backups and reporting/analytic jobs. However it has a big drawback - the application needs to be able to send writes to the master only. In this blog post, we explore the use of php-mysqlnd_ms with a PHP application (Wordpress) on a standard MySQL Replication backend.

Read the blog here

Do share these resources with your colleagues and follow us in our social media channels.

Have a good weekend,

Jean-Jérôme Schmidt
Planets9s Editor
Severalnines AB

Blog category:


How to build scalable database infrastructures with MariaDB & HAProxy: sign up for our webinar with WooServers

$
0
0

There’s still time to sign up for our webinar on Tuesday next week, February 23rd, on the scalable, open source database infrastructure behind CloudStats.me. Our friends from WooServers will be giving an overview of their project at cloudstats.me and discussing their past infrastructure challenges of scaling MySQL “write” performance with minimal cost, performance overhead and database management burden. The session will cover how they came to choose a MariaDB with MaxScale and HAProxy clustering solution, and how they leveraged ClusterControl. Sign up below:

Registration, Date & Time

Europe/MEA/APAC

Tuesday, February 23rd at 09:00 GMT / 10:00 CET (Germany, France, Sweden)
Register Now

North America/LatAm

Tuesday, February 23rd at 09:00 Pacific Time (US) / 12:00 Eastern Time (US)
Register Now

Agenda

  • CloudStats.me infrastructure overview
  • Database challenges
  • Limitations in cloud-based infrastructure
  • Scaling MySQL - many options
    • MySQL Cluster, Master-Slave Replication, Sharding, ...
  • Availability and failover
  • Application sharding vs auto-sharding
  • Migration to MariaDB / Galera Cluster with ClusterControl & NoSQL
  • Load Balancing with HAProxy & MaxScale
  • Infrastructure set up provided to CloudStats.me
    • Private Network, Cluster Nodes, H/W SSD Raid + BBU
  • What we learnt - “Know your data!”

Speakers

Andrey Vasilyev is the CTO of Aqua Networks Limited - a London-based company which owns brands, such as WooServers.com, CloudStats.me and CloudLayar.com. Andrey has been leading the company’s new product development initiatives for 5 years and worked closely with the development and sales teams helping turn customer feedback into mass-market products. Having previously worked at Bloomberg L.P. and UniCredit Bank, Andrey’s main focus has always been on building stable and reliable platforms capable of serving hundreds of thousands of users.

Art van Scheppingen is a Senior Support Engineer at Severalnines. He’s a pragmatic MySQL and Database expert with over 15 years experience in web development. He previously worked at Spil Games as Head of Database Engineering, where he kept a broad vision upon the whole database environment: from MySQL to Couchbase, Vertica to Hadoop and from Sphinx Search to SOLR. He regularly presents his work and projects at various conferences (Percona Live, FOSDEM) and related meetups.

We look forward to “seeing” you there and to some good discussions!

For more discussions on database clustering and high availability strategies, do visit our Webinars Replay page.

Blog category:

ClusterControl 1.2.12 - The Full Monty Release for MySQL, MariaDB, MongoDB & PostgreSQL

$
0
0

The Severalnines team is pleased to announce the release of ClusterControl 1.2.12.

This release contains key new features, such as support for the latest versions of MySQL, MariaDB, MongoDB & PostgreSQL, operational reports and enhanced backup options, along with performance improvements and bug fixes.

Highlights

  • New for MySQL, MariaDB, MongoDB & PostgreSQL
    • Operational Reports
    • Local Mirrored Repositories
    • Enhanced Backup Options
  • New for MySQL
    • Support for Oracle 5.7
    • New Replication Features for Master & Slave
    • Manage Garbd and MaxScale configurations
  • New for MariaDB
    • Support for 10.1
    • SSL Encryption of Galera Replication Links
    • Manage Garbd and MaxScale configurations
  • New for MongoDB
    • Support for 3.2
  • New for PostgreSQL
    • Support for 9.5

For additional details about the release:

Operational Reports for MySQL, MariaDB, MongoDB & PostgreSQL

It is now possible to generate, schedule and email out operational reports on the status of all databases managed by ClusterControl. See the Change Log for more details.

Enhanced Backup Options

Typically, sysadmins and DBAs tend to backup their databases from the same host; but what happens if the host goes down? Or the host changes role from slave to master? How does it impact database performance?

Setting the new auto select feature enables ClusterControl to always choose the optimal host to backup from. In case a specific host is configured for the backup, users are now able to select a failover host to backup from. See the full range of new backup options in the Change Log.

New MySQL Replication Features for Master & Slave

Whether users are looking for the most advanced MySQL slave server to use for Master promotion or whether they are in need of delayed replication slaves in their cluster, ClusterControl now comes with a series of new features simplify managing MySQL Replication set ups. To find out about more about these new features, read the Change Log.

Manage Garbd and MaxScale configurations

Configuration Management now also supports Garbd and MaxScale configurations. This allows you to customize both components after their deployment without having to edit the configurations commandline.

SSL Encryption of Galera Replication Links

This new feature is now available to MySQL / MariaDB Galera Cluster users, who are running clusters in a multi-datacenter environment or on less trusted networks. They can now enable/disable SSL encryption of Galera replication links at a click of a button in ClusterControl.

There are a bunch of other features and improvements that we have not mentioned here. You can find all details in the ChangeLog.

We encourage you to test this latest release and provide us with your feedback. If you’d like a demo, feel free to request one.

With over 8,000 users to date, ClusterControl is the leading, platform independent automation and management solution for MySQL, MariaDB, MongoDB and PostgreSQL.

Thank you for your ongoing support, and happy clustering!

For additional tips & tricks, follow our blog: http://www.severalnines.com/blog/

Blog category:

MySQL Replication failover: Maxscale vs MHA (part 1)

$
0
0

In our MySQL replication tutorial we have covered different aspects of replication including master failover by performing a slave promotion using ClusterControl. The slave promotion will turn a slave into the new master, and re-attach the remaining slaves in the topology under the new master. Keep in mind that ClusterControl will not perform an automated slave promotion in the current version. We do have a helper to find the most advanced slave (Cluster drop down: Find Most Advanced Slave) to determine the best candidate slave.

Another thing to keep in mind is that, as of time of writing, ClusterControl only supports replication topologies using MySQL GTID. You can add your existing MariaDB based replication topology to ClusterControl but promoting slaves can only be performed manually via command line. Supporting MariaDB GTID and automated failover are the top features on our wishlist for ClusterControl 1.3.

In case you do wish to perform slave promotion on MariaDB or wish to add automated failover in your replication topology, there are several options to choose from. At this moment the most commonly used products for automated failover are MySQL Master HA (aka MHA), Percona Replication Manager, but also newer options like Orchestrator and MaxScale + MariaDB Replication Manager have become available lately. In this post, we will focus on MySQL Master HA (MHA) and in our second part we will cover MaxScale + MariaDB Replication Manager.

MySQL Master-HA

MySQL Master-HA (MHA) was created by Yoshinori Matsunobu when he still worked for DeNA. The goal was to have a better and more reliable failover mechanism for MySQL replication with the shortest downtime as possible. MHA has been written in Perl and is not very actively developed anymore, but it is actively maintained. Bugs do get fixed and pull requests on the Github repositories get merged frequently. When MHA was created, it set the bar really high: it supports all replication methods (statement and row based replication) and acts as a binlog server as well to ensure all slaves become equally advanced.

Configuration

MHA consists out of two components: the MHA Manager and MHA Node. The Manager is the software that manages the failover, takes decisions on when and where to failover to while the Node software is a local agent that will monitor your MySQL instance and allow the Manager to copy relay logs from the slaves.

Configuring the MHA Manager includes creating a list of the MHA nodes and preferably assigning roles to each of these nodes. The roles can be either candidate_master or no_master. Assigning the role candidate_master means this node is considered a safe host to become the new master. Obviously you can have multiple candidate_master nodes defined. Setting the role to no_master will ensure MHA will never promote this host to a master. A good use case for this would be a delayed slave or a slave on lower spec hardware.

Failover procedure

The MHA failover procedure is a quite advanced procedure. The MHA Manager watches over the master and slaves, and continuously keeps track of their status. When one of the slaves fails, it should be excluded from the potential candidate masters set in the configuration. When the master fails you can run a pre-failover script, for instance to remove a virtual ip. Then the most advanced candidate master gets elected and its relay logs will be sent over to the manager. After this the slave will be promoted to master. Then the other hosts will be made equal by applying the retrieved relay logs and apply the delta in parallel to all slaves and attached to the new master. After this MHA will run post-failover scripts, send an email to the sysops and then exit. The exit is a deliberate choice as this prevents data loss and instability due to flapping.

Passwordless SSH

To enable MHA to copy the binary logs, test connectivity and promote a slave, a passwordless SSH user is needed. The MHA Node package also needs to be able to connect via SSH to the other slaves to distribute the binary logs. So all MHA nodes need to be able to connect to each other.

GTID

To ensure all transactions get applied to the new slaves, MHA scans the binlog for every host until the point where it applied the last transaction and then applies the delta. This works with both GTID implementations and masters without GTID as well.

Another option when using GTID is that you can define (external) binlog servers. If a binlog server has been defined and during failover, the binlog server is the most advanced, it will copy the binary logs from there.

Secondary manager node

MHA also supports a secondary Manager node for the failover procedure just in case there is network partitioning and the MHA primary server can’t see the master while the secondary can. In this case there will be no failover as the master is apparently not down. In case the second MHA Manager node cannot be reached, MHA will assume there is a complete network failure and will not failover.

Quick slave promotion

MHA is able to be 100% certain the master is down within 9-12 seconds and then a few seconds to send and apply the relay logs to the new master. This means the total failover time is about 10-30 seconds in total.

Conclusion

MHA has a very advanced replication failover mechanism with a rich feature set to cover a lot of different use cases. It can handle all replication methods with or without GTID and ensure all hosts are equal after performing the failover. The product is relatively mature after five years of existence but at the same time newer hybrid replication topologies arrive, like Galera masters with asynchronous slaves, and the question is whether these will be fully supported in the long run.

In our second part, we will cover the combination of MaxScale + MariaDB Replication Manager to provide automatic failover in MySQL replication.

Blog category:

MySQL Replication failover: Maxscale vs MHA (part 2)

$
0
0

In our previous post, we described how MySQL Master-HA (MHA) performs a so called slave promotion (also known as master failover) and ensures all remaining slaves in the topology get attached under the new master and become equal in data set.

Another failover solution is the MariaDB MaxScale proxy in combination with the MariaDB Replication Manager. Let’s look at how these two separate products can work together and perform a failover. We will also describe how you can use them.

MaxScale + MariaDB Replication Manager

MaxScale

For those unfamiliar with MaxScale: MaxScale is a versatile database proxy written in C that supports not only intelligent query routing but can also function as both a binlog server and intermediate master. MaxScale consists of five plugins: Authentication, Protocol, Monitor, Routing, Filter & Logging. The Monitor and Routing plugins are working together to make intelligent query routing possible as the monitor component keeps track of the replication topology while the query router then chooses the host to send the query to. You can for instance also add the Filter plugin to only have certain specific queries to go to specific hosts. With ClusterControl we install MaxScale by default with the monitor (MySQL or Galera) and router (read connection or read-write splitter) enabled.

As said before: maxscale is a versatile database proxy, so the monitor plugin can also be used for other purposes as well, for instance on certain events. The event will be the trigger to run a script that can handle the event change and act accordingly, for instance if a master goes down you can promote a slave to become the new master. Such a script should be able to send commands to the MariaDB Replication Manager.

The monitor configuration only needs three extra lines:

[MySQL Monitor]
type=monitor
module=mysqlmon
servers=svr_10101811,svr_10101812,svr_10101813
user=admin
passwd=B4F3CB4FD8132F78DC2994A3C2AC7EC0
monitor_interval=1000
live_nodes=$NODELIST
script=/usr/local/bin/failover.sh
events=master_down

MaxScale will send a few parameters to this script including the nodelist and the failed host. The script can then interpret this data and send it to the MariaDB Replication Manager.

MariaDB Replication Manager

The MariaDB Replication Manager (MRM) is a Go project that creates an executable after compiling. It is able to handle failover scenarios on MariaDB GTID based replication topologies. It can handle various scenarios when to failover, but the most commonly used are either failover on a dead master or promote a (most advanced) slave to become the new master. You can even have it run pre- and post-failover scripts to remove and set virtual ips for instance.

In the MaxScale + MRM combination, we don’t need to handle much more than a dead-master and create the new topology from there. There is no need for virtual ips as most probably MaxScale is already used to route the queries to the right hosts in the topology. As the MariaDB Replication Manager will promote a slave to become a master and reassign the slaves to the new master, MaxScale will almost instantly recognize the new master with its new topology and start routing the queries accordingly.

Installation

MRM is open source and available from the MariaDB Replication Manager repository on Github. It is easy to compile your own version of MRM, these are the steps I had to take on my test box (make sure to install Go first!):

git clone https://github.com/mariadb-corporation/replication-manager
cd replication-manager
go get github.com/go-sql-driver/mysql
go get github.com/nsf/termbox-go
go get github.com/tanji/mariadb-tools/dbhelper
go build
cp replication-manager /usr/local/bin
chmod 755 /usr/local/bin/replication-manager

That’s it and after this you should have a binary in /usr/local/bin to make it available for MaxScale to invoke.

A simple wrapper script is necessary to control MRM from the MaxScale triggers and have it translate the information given to the MRM parameters.

#!/bin/bash
# failover.sh
# wrapper script to repmgr

# user:password pair, must have administrative privileges.
user=root:admin
# user:password pair, must have REPLICATION SLAVE privileges. 
repluser=repluser:replpass

ARGS=$(getopt -o '' --long 'event:,initiator:,nodelist:' -- "$@")

eval set -- "$ARGS"

while true; do
    case "$1" in
        --event)
            shift;
            event=$1
            shift;
        ;;
        --initiator)
            shift;
            initiator=$1
            shift;
        ;;
        --nodelist)
            shift;
            nodelist=$1
            shift;
        ;;
        --)
            shift;
            break;
        ;;
    esac
done
/usr/local/bin/replication-manager -user $user -rpluser $repluser -hosts $nodelist -failover=force >> /var/log/mrm.log 2>&1

Note that this script is an “improved” version of the one from MariaDB’s blog post as our binary is named differently, we added logging and some of the MRM parameters have changed since.

Quick slave promotion

The MaxScale monitor plugin will immediately trigger the event once the master has changed state. We have looked into the code of MaxScale and this seems to be instant if the master is unreachable (correct us if we’re wrong here). The monitoring interval of MaxScale can be altered accordingly. We have set the interval to every 1000 ms which means MaxScale will start the failover procedure within 1-2 seconds. The failover procedure by the MariaDB Replication Manager is also only a few seconds. Detection of the new replication topology by MaxScale will also take a few seconds, so all in all, the failover should be done somewhere in the 10-20 seconds range.

Conclusion

The MaxScale proxy has a big advantage: it knows your replication topology by heart, sees queries being sent to the master and slaves and therefore it can detect master failure at a very early stage. It would also be able to react on different events sent from the monitor plugin and therefore it sounds like a quite flexible tool.

The MariaDB Replication Manager seems to implement the topology discovery for a second time and this can be a double edged sword: since it would be able to detect the topology by itself, it is not a blind tool that just executes a command. So, it could contradict what MaxScale’s intentions were and take a different decision. Also, it also doesn’t allow you to set up specific roles or filter out less preferable hosts, although that’s something you could do with some bash magic.

In our third part we’ll compare  side by side the combination of MaxScale + MariaDB Replication Manager and MySQL Master-HA.

Blog category:

MySQL Replication failover: Maxscale vs MHA (part 3)

$
0
0

In our previous two posts we described in depth how MySQL Master-HA (MHA) and MaxScale + MariaDB Replication Manager (MRM) both perform their so called slave promotions (also known as master failover). MHA has been created by Yoshinori Matsunobu when he still worked for DeNA and the product has been available for over five years. MaxScale is a MySQL proxy created by MariaDB and the combination with the MariaDB Replication Manager has only been added recently.

When we compare the two procedures, it is apparent they both have good sides and bad sides for automated failover. Both support adding and removing virtual ips and both check the entire topology during failover. It is difficult to say which one is better and which one is not so we will highlight the differences.

Comparison

Flapping

MHA protects itself by design from flapping by its one shot failover. If you ever have used MMM before, you are well aware what damage flapping can cause. On the other hand: if your master failed due to a capacity problem, it is most likely that the new master will fail before an engineer can act upon the failover, fix the master and restart MHA. MaxScale is able to promote another slave (or the old master) to a master if the new master is dead as well so it will continue to perform failover. However it is not protected against flapping as we configured it to act upon a the master_down event and once we have promoted a slave to master, it could trigger the event as well.

Lost transactions

MaxScale will not be able to have the slaves catch up until the last transactions of the binlog of the old master and not be able to have them catch up before attaching them to the new master. Due to the MariaDB GTID, the most advanced master will have the most transactions of the old master and the slaves can apply the remaining transactions and catch up. MHA copies the binlogs from the candidate master to ensure the MHA manager is up to date and MHA also works without GTID when applying the delta. This does mean that if the most advanced slave was not able to copy the last few transactions from the master you will lose them and when the master comes back online it may give conflicting transactions.

There is one plus using MaxScale: if you wish to have similar functionality as offered within MHA you could utilize MaxScale as a binlog server (and intermediate-master) to ensure that if the master is down you always have one single slave/intermediate-master that is the most advanced one. However the binlog server is beyond the scope of this article.

Network partitioning

If the master would “fail” due to a networking issue between MaxScale and the master, the failover procedure gets started regardless if the master really is failing. Especially with an unstable network, this could lead to potential flapping behaviour. Suppose the master comes back up again and goes down again shortly after due to the network issues, the “master down” event will be triggered a second time in MaxScale.

For MHA this has been taken care of by adding a second MHA Manager node, preferably in another section of your network. This gives MHA a better view on the situation and topology, it might not failover as it is unnecessary. For MaxScale this could be overcome by adding an extra check in the script that is executed by MaxScale, connect to another host in the network and check if the master is down from that host as well.

Roles

Within MHA you are able to apply roles to a specific host, so for instance ‘candidate_master’ and ‘no_master’ will help you determine which hosts are preferred to become master. A good example could be the data center topology: spread the candidate master nodes over multiple racks to ensure HA. Or perhaps you have a delayed slave that may never become the new master even if it is the last node remaining.

This last scenario is likely to happen with MariaDB Replication Manager as it can’t see the other nodes anymore and thus can’t determine that this node is actually, for instance, 24 hours behind. MariaDB does not support the Delayed Slave command but you could use pt-slave-delay instead. There is a way to set the maximum slave delay allowed for MRM, however MRM reads the Seconds_Behind_Master from the slave status output. Since MRM is executed after the master is dead, this value will obviously be null.

Conclusion

MHA is still more advanced, more intelligent and more versatile than MaxScale with the MariaDB Replication Manager. It can handle all replication methods with or without GTID and ensure all hosts are equal. The product is relatively mature after five years of existence but at the same time new replication topologies arrive, like Galera masters with asynchronous slaves, and the question is if these will be supported.

MaxScale is really good at figuring out the topology of the hosts and detecting dead hosts while it delegates the failover to the MariaDB Replication Manager. The MariaDB Replication Manager has to detect the topology again and it works great in various topologies but limits you to MariaDB GTID replication. MaxScale has a lot of potential and the decoupling between detection and failover make it quite flexible. At the same time this is a huge pitfall: relying on external scripts invoking external binaries can be error prone. For instance the example on MariaDB’s website is no longer functioning with the existing MRM code in Github and thus no failover will happen. Extending the script with extra checks can also lead to more false positives or negatives.

MaxScale would be more robust and fail safe if multiple MaxScale instances could communicate with each other, make decisions based on multiple angles and have a routing plugin perform the failover. This way there is only one product involved and the failover logic is not duplicated over multiple products.

Blog category:

Planets9s: Building scalable database infrastructures with MariaDB & HAProxy

$
0
0

Welcome to this week’s Planets9s, covering all the latest resources and technologies we create around automation and management of open source databases.

Watch the replay: How to build scalable database infrastructures with MariaDB & HAProxy

You can now sign up to watch the replay of this week’s webinar with our partner WooServers - How CloudStats.me moved from MySQL to clustered MariaDB for High Availability. This webinar covered how CloudStats.me evaluated solutions from NDB Cluster to MySQL Replication with application sharding in order to scale MySQL write performance.  

Sign up to watch the replay.

MySQL Replication failover: Maxscale vs MHA (Parts 1 to 3)

At present, the most commonly used products for automated failover are MySQL Master HA (aka MHA), Percona Replication Manager, but also newer options like Orchestrator and MaxScale + MariaDB Replication Manager have become available lately. In this three-parts blog series, we first focus on MySQL Master HA (MHA), in our second part we cover MaxScale + MariaDB Replication Manager and the final part compares the two with each other.

Polyglot Persistence for the MongoDB, PostgreSQL & MySQL DBA

The introduction of DevOps in organisations has changed the development process, and perhaps introduced some challenges. Developers, in addition to their own preferred programming languages, also have their own preference for backend storage.The former is often referred to as polyglot languages and the latter as polyglot persistence. This webinar covered the four major operational challenges for MySQL, MongoDB & PostgreSQL: Deployment, Management, Monitoring, Scaling and how to deal with them.

Sign up to watch the replay!

Do share these resources with your colleagues and follow us in our social media channels.

Have a good end of the week,

Jean-Jérôme Schmidt
Planets9s Editor
Severalnines AB

Webinar Replay & Slides: How to build scalable database infrastructures with MariaDB & HAProxy

$
0
0

Thanks to everyone who participated in last week’s live webinar on how CloudStats.me moved from MySQL to clustered MariaDB for high availability with Severalnines ClusterControl. The webinar included use case discussions on cloudstats.me’s database infrastructure bundled with a live demonstration of ClusterControl to illustrate the key elements that were discussed.

We had a lot of questions in the audience and you can read through the transcript of these further below in this blog.

If you missed the session and/or would like to watch the replay in your own time, it is now available online for sign up and viewing.

Replay Details

Get access to the replay

Agenda

  • CloudStats.me infrastructure overview
  • Database challenges
  • Limitations in cloud-based infrastructure
  • Scaling MySQL - many options
    • MySQL Cluster, Master-Slave Replication, Sharding, ...
  • Availability and failover
  • Application sharding vs auto-sharding
  • Migration to MariaDB / Galera Cluster with ClusterControl & NoSQL
  • Load Balancing with HAProxy & MaxScale
  • Infrastructure set up provided to CloudStats.me
    • Private Network, Cluster Nodes, H/W SSD Raid + BBU
  • What we learnt - “Know your data!”

Speakers

Andrey Vasilyev, CTO of Aqua Networks Limited - a London-based company which owns brands, such as WooServers.com, CloudStats.me and CloudLayar.com, and Art van Scheppingen, Senior Support Engineer at Severalnines, discussed the challenges encountered by CloudStats.me in achieving database high availability and performance, as well as the solutions that were implemented to overcome these challenges.

If you have any questions or would like a personalised live demo, please do contact us.

Follow our technical blogs: http://severalnines.com/blog


Questions & Answers - Transcript

Maybe my question is not directly related to the topic of the webinar... But will your company (I mean Severalnines) in the future also consider the possibility to install and setup Pivotal's Greenplum database?
Currently, there are no plans for us that, as we have not received requests to support Greenplum yet. But it’s something we’ll keep in mind!

What about Spider and ClusterControl? Is this combination available / being used?
Spider can be used independently of ClusterControl, since ClusterControl can be used to manage the individual MySQL instances. We are not aware of any ClusterControl users who are using Spider.

Is MySQL Cluster NDB much faster than a Galera Cluster?
MySQL NDB and Galera Cluster are two different types of clustering. The main difference is that in Galera Cluster all nodes are equal and contain the same dataset, while with NDB Cluster the data nodes contain sharded/mirrored data sets. NDB Cluster can handle larger data sets to write, but if you need multiple equal MySQL master nodes Galera is a better choice. Galera is also faster in replicating data than a traditional MySQL replication due to the ability to write all queries in parallel.

Does CloudStats also support database backups on the end user level?
CloudStats can backup your files to S3, Azure, locally etc., but for database backup, it’s best to use ClusterControl, while CloudStats is for the rest of files.

Is it possible to restore the structure and the whole setup of a previous ClusterControl infrastructure from the backups?
Yes, that would be possible, if you make backups of your existing ClusterControl database and configuration files.

I'm using Maxscale with Galera. The Read/Write Split modules drop the connection on very intensive operations involving reading and then writing of rows up to 80,000, but works fine with readconnroute module (which doesn't split). Anyway I can scale writes involving just Galera?
You could create two readconnroute interfaces using MaxScale and use one for writes only. You can do this by adding router_options=master to the configuration and with a Galera cluster this will only write to one single node in the Galera cluster.

Cluster is fast as the slowest node? like NODE1-SSD, NODE2-SSD, NODE3-SATA...
Yes, within Galera Cluster your slowest node will determine the speed of the whole cluster

Galera cluster is INNODB only. If it is. Is it recommended not to use MyISAM?
In principle Galera is InnoDB only, however there is limited support for MyISAM if you encapsulate your queries in a transaction. As there is no guarantee the data will be kept equal on all nodes due to MyISAM not being a transactional storage engine and this could cause data drift to happen. Using MyISAM with Galera is not advised to do.

Virtualized nodes should then be on SSD host storage. Not network storage because IOPS will be low. Correct?
Yes, that's correct, its best to store it on a local ssd.

MySQLdump is slow right?
MySQLdump is dumping the entire contents of your database as a logical backup and therefore slower than Xtrabackup.

HAProxy instances are installed on 2x cluster control servers?
HAProxy instances are usually installed on dedicated hosts, not on the CC node.

What about MySQL proxy, and use cases with that tool? And would it be better to just split query R/W at application level?
MySQL proxy can be used, but the tool is not maintained anymore and we found HAProxy and MaxScale are better options.

HAProxy can run custom scripts and these statuses can also be manually created right?
Exactly, you can do that. ClusterControl just has a few preset checks by default but you can change them if you like

In your experience, how does EC2 perform with a MariaDB based cluster?
According to our Benchmarks, EC2 M3.Xlarge instances showed a Read Output performance of 16914 and Write Input Performance of 31092, which is 2 times higher than a similar sized Microsoft Azure DS3 instance (16329 iops for Reads and 15900 iops for Writes). So yes, according to our test AWS might perform better than Azure for Write performance, but it will depend on your application size and requirements. A local SSD storage on a server might be recommended for higher iops performance.

Blue - Reads
Red  - Writes

Does WooServers offer PCI DSS compliant servers?
Yes, WooServers offer PCI DSS servers and are able to manage your current infrastructure that you have, either on Azure, on premises or AWS.

AAA pluggable / scriptable? A customer came up with Radius recently…
Unfortunately the authentication/authorization is limited to either ClusterControl internal AAA or LDAP only.

Also: GUI functions accessible via JSON/HTTP API ?
Yes, our most important GUI functions are available through our RPC api. So you would be able to automate deploying, backups and scaling easily.


Newly Updated “MySQL Load Balancing with HAProxy” Tutorial

$
0
0

We are glad to announce that one of our most popular tutorials has just been updated and is available here. In this tutorial, we cover how HAProxy works, and how to deploy, configure and manage HAProxy in conjunction with MySQL using ClusterControl.

Applications typically connect to a database cluster or replicated setup by opening connections on one of the database nodes in order to run transactions. If the database node fails, the client would need to reconnect to another database node before it can continue to serve requests. There are database drive that supports connection pooling, load balancing and failover e.g. Connector/J and PHP MySQL native driver for master slave. However, in other clustering setup like Galera Cluster for MySQL or MariaDB, the JDBC and PHP drivers are not aware of internal Galera state information, and introducing a reverse proxy layer will make your architecture expandable in the future.

In short, there are 3 health check methods that can be used with MySQL:

  • mysql-check
  • tcp-check
  • httpchk

Some health check methods require a health check script tailored for it. Configuring health check is the key component to correctly identify the backend MySQL servers so HAProxy can route the incoming connections to the correct server. It reduces the application complexity when dealing with constantly changing cluster or replication state.

We also covered how HAProxy performs failure detection, what configuration options should we tweak for different environments, what is the recommended architecture to avoid single point of failure (SPOF), etc.

New chapters introduced in this tutorial:

  • Read-write splitting with HAProxy
  • How health check should be performed on different MySQL setups
  • Updated deployment instructions with ClusterControl
  • HAProxy redundancy with Keepalived
  • Monitoring HAProxy
  • Troubleshooting and workaround on common issues

Take a look at the tutorial. Happy load balancing!

Planets9s: Sign up for our best practices webinar on how to upgrade to MySQL 5.7

$
0
0

Welcome to this week’s Planets9s, covering all the latest resources and technologies we create around automation and management of open source databases.

Sign up for our best practices webinar on how to upgrade to MySQL 5.7

Join us on Tuesday, March 15th for this new webinar on best practices for upgrading to MySQL 5.7 led by Krzysztof Książek, Senior Support Engineer at Severalnines.

MySQL 5.7 has been around for a while now, and if you haven’t done so yet, it’s probably about time to start thinking about upgrading. There are a few things to keep in mind when planning an upgrade, such as important changes between versions 5.6 and 5.7 as well as detailed testing that needs to precede any upgrade process. Amongst other things, we’ll look at how to best research, prepare and perform such tests before the time comes to finally start the upgrade.

Sign up today

Newly Updated “MySQL Load Balancing with HAProxy” Tutorial

We are glad to announce that one of our most popular tutorials, MySQL Load Balancing with HAProxy, has just been updated and is available online. In this tutorial, we cover how HAProxy works, and how to deploy, configure and manage HAProxy in conjunction with MySQL using ClusterControl.

Read the tutorial

Watch the replay: How to build scalable database infrastructures with MariaDB & HAProxy

Thanks to everyone who participated in last week’s live webinar on how CloudStats.me moved from MySQL to clustered MariaDB for high availability with Severalnines ClusterControl. The webinar included use case discussions on CloudStats.me’s database infrastructure bundled with a live demonstration of ClusterControl to illustrate the key elements that were discussed.

Watch the replay

Do share these resources with your colleagues and follow us in our social media channels.

Have a good end of the week,

Jean-Jérôme Schmidt

Planets9s Editor
Severalnines AB

MySQL Load Balancing with ProxySQL - an Overview

$
0
0

Year 2015 was a good year for proxies in MySQL environments. First, MariaDB released a GA version of MaxScale, a new proxy that understands MySQL Replication and Galera topologies and supports read-write splitting. Later in the year, at Percona Live Europe in Amsterdam, ProxySQL was announced as GA by its creator, René Cannaò.

ProxySQL was created for DBAs by René, himself a DBA trying to solve issues when working with complex replication topologies.

In this blog, we’ll give you an overview of ProxySQL, and show you how to install and configure it.

Installation of ProxySQL

Initial installation is pretty simple - all you need to do is grab the latest binaries from the site:

https://github.com/sysown/proxysql/releases/

and install them using rpm or dpkg:

root@cmon:~# wget https://github.com/sysown/proxysql/releases/download/v1.1.1-beta.6/proxysql_1.1.1-ubuntu14_amd64.deb
root@cmon:~# dpkg -i proxysql_1.1.1-ubuntu14_amd64.deb

Then, we can start the service.

root@cmon:~# service proxysql start
Starting ProxySQL: DONE!

At first start, ProxySQL loads an initial configuration which allows you to connect to it and configure it using MySQL client and an SQL-like language. By default, you will use user ‘admin’ with a password ‘admin’. It can be changed in the configuration file, /etc/proxysql.cnf, but it has to be done before the first start of the ProxySQL - this file is read only at the first start or when you explicitly initialize the config through:

service proxysql initial

Any further changes, including changing user and password for the CLI, will have to be made using the CLI and won’t be mirrored in the /etc/proxysql.cnf file.

It doesn’t mean there’s no way to store configuration persistently - ProxySQL uses a SQLite database for that - more details will follow later in this post.

By default, ProxySQL management interface should be listening on port 6032. You can use a standard MySQL command line client to connect to it:

root@cmon:~# mysql -u admin -padmin -h 127.0.0.1 -P6032

From here, we’ll be using an SQL-like language to configure the proxy and check its metrics. This may seem odd at the beginning, but for DBAs, using SQL to configure software should not pose a problem. Additionally, as ProxySQL is reachable using MySQL client, making changes in the configuration or checking the status of the proxy from external tools is rather easy - you can connect to the proxy in a same way you’d connect to MySQL.

Configuring ProxySQL

Before we proceed with configuration, we’ll need to understand another important concept. ProxySQL lets you introduce configuration changes at runtime. The exact behavior is slightly different to what you see in, e.g., MySQL - it’s more similar to what you’d see in a Cisco router or switch.

There are three ‘layers’ of configuration - first you edit some settings but this change is not applied immediately. You need to explicitly load them to runtime. Next, if you want to store them on persistent storage, you also have to do it explicitly. This sounds complex but it’s actually very useful - it helps to implement complex changes in the proxy configuration.

Let’s say you need to redesign your query routing rules and make some complex changes in how some of the variables are set. Usually it should be possible to apply those modifications one by one, but it may happen that such approach causes additional troubles. It’s similar to what we are used to in SQL - most of the queries can be executed on their own but from time to time, larger, more complex transactions are needed.

After we apply the change to runtime and verify it works correctly, you can to store them on disk, for safe, persistent store. If anything goes wrong, you can easily rollback the changes by loading the old configuration from disk and applying it to runtime.

Let’s take a closer look at the CLI and how the whole configuration looks like.

mysql> show databases;
+-----+---------+-------------------------------+
| seq | name    | file                          |
+-----+---------+-------------------------------+
| 0   | main    |                               |
| 2   | disk    | /var/lib/proxysql/proxysql.db |
| 3   | stats   |                               |
| 4   | monitor |                               |
+-----+---------+-------------------------------+
4 rows in set (0.00 sec)

As you can see, we have couple of ‘databases’ defined in the ProxySQL. ‘main’ contain current configuration - if you modify it by means of running SQL, changes will be shown here even before you apply them to the runtime configuration.

‘disk’ schema is a persistent, on-disk store. Settings that you see here had been explicitly stored ‘on disk’.

‘stats’ schema is generated ‘on the fly’, from the data collected and stored in the proxysql process. You can check here different statistics regarding the proxy itself but also traffic that’s going through it. Finally, we have the ‘monitor’ schema which presents data collected by the monitoring module. We will discuss exactly how ProxySQL monitors hosts later in this blog post. But before we do this, let’s go over all schemas available in ProxySQL and see what can we find there.

‘main’ and ‘disk’ schemas

Those schemas contain the configuration of ProxySQL and tables are the same in both of them. We won’t discuss every option in there, but we’ll do our best to cover the most important settings available.

mysql> show tables from main;
+------------------------------+
| tables                       |
+------------------------------+
| mysql_servers                |
| mysql_users                  |
| mysql_replication_hostgroups |
| mysql_query_rules            |
| global_variables             |
| mysql_collations             |
+------------------------------+
6 rows in set (0.00 sec)

mysql_servers table

mysql_servers - this is a table in which a user defines a list of backend nodes. Sample contents may look like below:

mysql> select * from mysql_servers\G
*************************** 1. row ***************************
       hostgroup_id: 0
           hostname: 172.30.4.212
               port: 3306
             status: ONLINE
             weight: 1
        compression: 0
    max_connections: 1000
max_replication_lag: 0
*************************** 2. row ***************************
       hostgroup_id: 1
           hostname: 172.30.4.145
               port: 3306
             status: ONLINE
             weight: 1
        compression: 0
    max_connections: 1000
max_replication_lag: 0
*************************** 3. row ***************************
       hostgroup_id: 1
           hostname: 172.30.4.25
               port: 3306
             status: ONLINE
             weight: 1
        compression: 0
    max_connections: 1000
max_replication_lag: 0
3 rows in set (0.00 sec)

As you can see, there are couple of things you can set here. Some are obvious like hostname and port. Additionally you can set a status of the node, for example, mark it as offline and make sure it is not receiving any traffic.

Weight is also self-explanatory - you can define different weight on different nodes in order to route larger part of the traffic to some of the nodes which maybe have better, faster hardware. For a Galera Cluster it won’t make much of a difference (although even here you could benefit from routing more or less read-only traffic to some nodes only), but such setup is not uncommon when we use MySQL replication and, for example, one node is a dedicated backup host. In such case you may still want this node to be in rotation - if everything else fails, it’s still better to use it than to run out of backends, but as long as everything is ok, you don’t want it to take as much traffic as other slaves.

Compression - this feature allows you to enable compression between client and proxy. Similar to regular MySQL, compression has to be initiated by the client. Max connections and max replication lag - those two settings are also pretty clear. It’s all about maximum number of connections ProxySQL can direct to a particular backend. Maximum replication lag, on the other hand, tells us how badly a node can lag before it will be automatically shunned and removed out of rotation. For this feature to work, the monitoring module has to be configured correctly.

We left the first attribute, hostgroup_id, at the end - this is because it requires some additional explanation. ProxySQL is designed around the concept of hostgroups - different set of nodes which are somehow related. This can be anything, really. The simplest example would be master and slaves. Master would form one hostgroup, with only one node in it, slaves would form another hostgroup. But it can be much more complex. Maybe you want to combine a couple of slaves or nodes which serve a particular type of the traffic? Maybe you want to differentiate between regular slaves, reporting slaves and backup slaves? Hostgroups are there to make this possible. You can create different hostgroups and then route different type of traffic to them - we’ll get to that part later in this post.

mysql_users table

mysql> select * from mysql_users\G
*************************** 1. row ***************************
              username: sbtest
              password: sbtest
                active: 1
               use_ssl: 0
     default_hostgroup: 0
        default_schema: NULL
         schema_locked: 0
transaction_persistent: 0
          fast_forward: 0
               backend: 1
              frontend: 1
       max_connections: 10000
1 row in set (0.00 sec)

This table stores settings about users that are allowed to connect to the proxy and to the database. In general, when a client connects to a proxy, it authenticates against ProxySQL. ProxySQL, on the other hand, keeps multiple connections open to the backend and determines if one of them can be used for this particular user. If not, a new connection is created.

Most important settings here are, obviously, username and password. Next we can set the ‘active’ flag, determining if the account is treated as active or not. You can also enable SSL for the connection. Default hostgroup will come important later, when we’ll discuss the query routing. In general, this is a hostgroup where all traffic that did not match any routing rules will end. As long as it was generated by this particular user, that is. Default schema and max connections are the remaining settings we’d like to cover here - those are pretty self-explanatory. You can define a default schema for the connections created by a particular user - similar to how you do that when using MySQL client. Max connections is also pretty clear - it’s a maximum number of connections that given user can have open.

mysql_replication_hostgroups

mysql> show create table mysql_replication_hostgroups\G
*************************** 1. row ***************************
       table: mysql_replication_hostgroups
Create Table: CREATE TABLE mysql_replication_hostgroups (
writer_hostgroup INT CHECK (writer_hostgroup>=0) NOT NULL PRIMARY KEY,
reader_hostgroup INT NOT NULL CHECK (reader_hostgroup<>writer_hostgroup AND reader_hostgroup>0),
UNIQUE (reader_hostgroup))

This table can be used to define master - slave relationship between hostgroups. The idea behind it is that, under some conditions (two hostgroups only, one for a master and one for all slaves, read_only is used to differentiate master and slaves) it is possible for ProxySQL to start monitoring the read_only flag on those hosts. Through this, it can follow the topology changes and automatically introduce changes in the server definitions to mirror the topology. As we stated, you need to use the ‘read_only’ flag to mark master (read_only=0) and slaves (read_only=1). If you promote slave as a new master and change read_only flags accordingly, ProxySQL can detect such change and move old ‘master’ host to the ‘reader’ hostgroup while new master will be moved to the ‘writer’ hostgroup. This feature requires to have a correctly configured monitoring module and query rules set accordingly (send DML’s to the ‘writer’ hostgroup, SELECTs to the ‘reader’ hostgroup). We will discuss different failover scenarios in MySQL replication environment using ProxySQL in a follow-up post.

mysql_query_rules table

mysql> select * from mysql_query_rules\G
*************************** 1. row ***************************
              rule_id: 1
               active: 1
             username: NULL
           schemaname: NULL
               flagIN: 0
         match_digest: NULL
        match_pattern: ^SELECT.*FOR UPDATE$
 negate_match_pattern: 0
              flagOUT: NULL
      replace_pattern: NULL
destination_hostgroup: 0
            cache_ttl: NULL
            reconnect: NULL
              timeout: NULL
                delay: NULL
            error_msg: NULL
                apply: 1
*************************** 2. row ***************************
              rule_id: 2
               active: 1
             username: NULL
           schemaname: NULL
               flagIN: 0
         match_digest: NULL
        match_pattern: ^SELECT
 negate_match_pattern: 0
              flagOUT: NULL
      replace_pattern: NULL
destination_hostgroup: 1
            cache_ttl: 100
            reconnect: NULL
              timeout: NULL
                delay: NULL
            error_msg: NULL
                apply: 1
2 rows in set (0.01 sec)

This table contains a list of different rules which governs how a query will be routed. Column ‘rule_id’ is auto-incremented. The idea is that queries are being tested against rules in order of rule_id (which means in order they were created). This works similarly to how iptables rules do - a query is checked against ‘match_pattern’ for every rule starting from ‘rule_id’=1. If a query matches the pattern, it is routed to the ‘destination_hostgroup’. If not - it’s checked against another rule. If a query doesn’t match any rules, it’ll be routed to the hostgroup defined in ‘default_hostgroup’ for the user who issued the query (in mysql_user table).

Other settings worth mentioning are ‘replace_pattern’ - it allows you to replace a matched pattern by some other string. This allows user to modify queries and rewrite them into some other form - pretty useful when you are dealing with a query you can’t modify on the application side, yet you know it can be rewritten into a more optimal form. When talking about matching, there’s also ‘negate_match_pattern’ - when enabled, the rule will match every query but the ones which fit the matching pattern. The rule can be ‘active’ or not, it’s also possible to define ‘cache_ttl’ - a time in milliseconds for which ProxySQL will cache queries that match a given pattern. Queries can also be filtered by the user which issue them or by schema they connect to - we are talking about ‘USE myschema’ type of schema switch or default schema defined when starting a connection.

Our example is almost the most simplest one you can have - it implements read-write split. In the first rule we catch all SELECT … FOR UPDATE queries and route them to the hostgroup ‘0’ - we also have this hostgroup defined as a default one for our application user. Second rule, matching SELECT statements, send those queries to the hostgroup ‘1’. All queries which does not match the rules will be routed to the default hostgroup, ‘0’. So, in short - all SELECTs are routed to the hostgroup ‘1’ - our ‘read’ group. Remaining queries (INSERTs, UPDATEs, ALTERs etc), including SELECT … FOR UPDATE, are routed to the hostgroup ‘0’ - our ‘write’ group.

Remaining tables

There are two more tables in the ‘main’ and ‘disk’ schemas, which we are not going to cover in detail. One of them is ‘mysql_collations’ which lists collations supported by ProxySQL. Another one, ‘global_variables’ contains different variables in a key->value format which govern ProxySQL’s behavior. Any changes have to be introduced here, by updating relevant key and loading changes into runtime using  ‘LOAD MYSQL VARIABLES TO RUNTIME’ or ‘LOAD ADMIN VARIABLES TO RUNTIME’ and save them to the persistent storage using ‘SAVE MYSQL VARIABLES TO DISK’ or ‘SAVE ADMIN VARIABLES TO DISK’. Which one to choose (MYSQL or ADMIN) depends on which variables you’ve changed. There are two types of variables - ones with a prefix of ‘admin-’ and ones with a prefix of ‘mysql-’. This governs which statement should be used to apply configuration changes.

Detailed guide on the ProxySQL variables is out of scope for this blog post - there are many things you can tweak here, starting from access credentials for ProxySQL management CLI to how it monitors hosts. We will discuss some of them in upcoming posts when we’ll be discussing the process of setting up ProxySQL to work with MySQL replication and Galera.

‘stats’ schema

This schema stores different types of statistical data related to the operations within ProxySQL.

mysql> show tables from stats;
+--------------------------------+
| tables                         |
+--------------------------------+
| stats_mysql_query_rules        |
| stats_mysql_commands_counters  |
| stats_mysql_processlist        |
| stats_mysql_connection_pool    |
| stats_mysql_query_digest       |
| stats_mysql_query_digest_reset |
| stats_mysql_global             |
+--------------------------------+
7 rows in set (0.01 sec)

We can see here statistics regarding query rules - how many times a given rule was used.  MySQL counter statistics tells us how often a particular MySQL command has been executed and what the execution time looks like. MySQL processlist is another very useful tool - it gives you a view, similar to MySQL ‘SHOW PROCESSLIST’ command, with information about running queries, from which host the query originated, to which backend it was routed, how long it’s being executed. Another table, ‘stats_mysql_connection_pool’ gives us a list of the backends, their states and statistics - how many connections do we have open against each of them, how many errors happened on each backend, how many connections are free in the pool, how many queries have been executed, how much data has been exchanged from a backend node. ProxySQL provides you also with overall statistics about its operations - numbers of connections created, aborted and connected on both sides (client and backend), information about data transferred through the proxy, number of queries, rollbacks and so on.

Finally, we have a table called ‘stats_mysql_query_digest’, which contains data about queries - hostgroup where it was executed, digest hash, generic form of the query, how many times it was executed, when it was first executed, when was the last time a given query showed up in ProxySQL, summary time for all executions, maximum and minimum execution time. This data gives a DBA a nice, overall overview of the performance of his queries. It’s not something which could replace SQL reviews based on slow log and executed using pt-query-digest, but it should be more than enough to handle most of the typical cases and significantly helps with debugging performance problems.

ProxySQL allows you to flush the data located in this table - you can query stats_mysql_query_digest_reset table and statistics will be cleared after you get the result.

‘monitor’ schema

Monitor schema stores a couple of tables related to the monitor module. You can find here information about checks that the monitoring module performs - if it was able to connect to the backend node, what the network latency looked like. If you use MySQL replication and configured writer and reader hostgroups, you’ll see also data on read_only flag. There’s also a log covering slave lag, should you decide to shun some of the slaves after the lag crosses some threshold.

Monitoring in ProxySQL

We are reaching the end of this blog post, but before we conclude it, we’d like to discuss one rather important characteristic of ProxySQL. There are many ways to monitor MySQL’s health. Some applications use ‘ping’ to check the status of MySQL servers, this pattern is also used on the connector level. Some tools check if port 3306 is open, assuming that open port means that MySQL is up and running. Some tools use monitoring modules which check the state of MySQL on some predefined interval. All these methods have flaws, unfortunately. There’s always a period of time between ‘ping’ and the query itself (even if it’s a very short period) - in that time MySQL could have died. Open port doesn’t mean you can actually connect to the MySQL instance and execute a query. Monitoring modules usually have some kind of interval that they run on - every 1 second, every 0.1 second. Between subsequent runs, there’s always some time in which MySQL could have changed its state.

ProxySQL uses different approach. It does use monitoring module, but this module is not used for the purpose of checking the health of a backend node. It can be used to check some of the properties of the backend - how big is the slave lag or whether the read_only is enabled or not. The health, though, is checked on multiple stages during the query execution - if a connection can be established to a backend and the query executed correctly, the backend is alive. If it cannot be established for a defined period of time (1000 milliseconds by default - it’s defined by mysql-connect_timeout_server variable), or something else prevents the query execution (query got killed or backend crashed when query was still running), backend is treated as unhealthy. By default, five failed attempts result in a backend marked as ‘shunned’ and the query is routed to another backend in the hostgroup (if any). If there is no available backend or all of them are not available, ProxySQL will keep trying to execute a query for mysql-connect_timeout_server_max - by default it’s 10000 ms. If it hits this timeout, an error is returned to the application. Server which is shunned won’t receive any further traffic for a duration of mysql-shun_recovery_time_sec (10s by default). After this time, the backend is marked again as online and it takes part in the query routing. Status of the server is checked on all steps of the query execution, so it’s not that only new queries can mark backend node as shunned.

There are pros and cons of this approach. What’s great is that, as long as there’s a backend node available, the application won’t see any errors. The application connects to ProxySQL and the rest of the routing, along with problem solving and rerouting queries from failed nodes, happens in the background and is transparent to the application. As long as ProxySQL can find a host able to run a query and not spend more than 10s on it, there’s no error to the application.

On the cons side, when a node goes down, some time is needed before it gets marked as ‘shunned’ and traffic gets routed away from it. It means that for a duration of mysql-connect_timeout_server queries will hit a backend node which is down. They will, eventually, be rerouted to some other nodes but their latency will be increased up to mysql-connect_timeout_server milliseconds. It is disputable whether it’s better to rollback a transaction or accept increased latency - it depends on the query mix and how complex transactions are. Simple transactions with a single query would probably be better with retrying them immediately on a new host. Large, long and complex transactions would probably benefit from waiting a bit than being rolled back. On the other hand, timeouts are configurable so you can control the theoretical maximal increase in latency.

In this post we’ve gone through the ProxySQL setup and some of the features it provides. We’ve discussed some of the aspects of its configuration. In the next blog on ProxySQL, we are going to focus on setting up a MySQL replication topology and show how to monitor operations inside ProxySQL.

Planets9s - Watch the replay: How To Set Up SQL Load Balancing with HAProxy

$
0
0

Welcome to this week’s Planets9s, covering all the latest resources and technologies we create around automation and management of open source databases.

Watch the replay: How To Set Up SQL Load Balancing with HAProxy

This webinar covers the concepts around the popular open-source HAProxy load balancer, and shows you how to use it with your SQL-based database clusters. High availability strategies for HAProxy with Keepalived and Virtual IP are also discussed. This is a great webinar to watch as a complement to our popular load balancing tutorial.

Watch the replay

Sign up for our best practices webinar on how to upgrade to MySQL 5.7

Join us next Tuesday for this live webinar on best practices for upgrading to MySQL 5.7!

There are a few things to keep in mind when planning an upgrade like this, such as important changes between versions 5.6 and 5.7 as well as the detailed testing that needs to precede any upgrade process. Amongst other things, we’ll look at how to best research, prepare and perform such tests before the time comes to finally start the upgrade.

Sign up today

Success story: iyzico uses ClusterControl to increase MySQL database uptime

Discover why ClusterControl was chosen by iyzico, a PCI DSS Level-1 certified Payment Service Provider in Turkey, to manage its high availability databases across multiple datacenters. It took only three weeks for iyzico to go live on ClusterControl.

Read the customer success story

Do share these resources with your colleagues and follow us in our social media channels.

Have a good end of the week,

Jean-Jérôme Schmidt
Planets9s Editor
Severalnines AB

ClusterControl Developer Studio: automatically scale your clusters

$
0
0

In the previous blog posts, we gave a brief introduction to ClusterControl Developer Studio and the ClusterControl Domain Specific Language and how to extract information from the Performance Schema. ClusterControl’s Developer Studio allows you to write your own scripts, advisors and alerts. With just a few lines of code, you can already automate your clusters!

In this blog post we will dive deeper into Developer Studio and show you how you can keep an eye on performance and at the same time scale out the number of read slaves in your replication topology whenever it is necessary.

CMON RPC

The key element in our advisor will be talking to the CMON RPC: ClusterControl’s API that enables you to automate tasks. Many of the components of ClusterControl make use of this API as well and a great deal of functionality is accessible via the API.

To be able to talk to the CMON RPC we will need to install/import the cmonrpc.js helper file from the Severalnines Github Developer Studio repository into your own Developer Studio. We described this process briefly in our introductory blog post. Alternatively you could create a new file named common/cmonrpc.js and paste the contents in there.

This helper file has only one usable function that interacts with the CMON RPC at the moment: addNode. All the other functions in this helper are supporting this process, like for instance the setCmonrpcToken function that adds the RPC token in the JSON body if RPC tokens are in use.

The cmonrpc helper expects the following variables to be present:

var CMONRPC_HOST = 'localhost';
var CMONRPC_PORT = '9500';
var CMONRPC_TOKEN = ["token0", "token1", “token2”];
var FREE_HOSTS = ["10.10.10.12", "10.10.10.13", "10.10.10.14"];

The FREE_HOSTS variable contains the ip addresses of the hosts we want to use as read slaves. This variable will be used by the findUnusedHosts function and compared against the hosts already present in the cluster and return an unused host or false in case there is no unused host available.

The CMONRPC_TOKEN variable contains the RPC tokens when used. The first token will be the token found in the main cmon.cnf. If you are not using RPC tokens in your configuration, you can leave them empty.

NOTE: Currently as of 1.2.12 the ClusterControl web application does not support having a RPC token in the cmon.cnf file. If you want to run both this advisor and access the web application at the same time, then comment out the RPC token in the cmon.cnf file and leave the CMON_RPCTOKEN variable empty.

Auto Scale

Our auto scaling advisor is a very basic one: we simply look at the number of connections on our master and slaves. If we find the number of connections excessive on the slaves, we need to scale out our reads and we can do this by adding fresh servers.

We will look at long(er) term connections to prevent our advisor from scaling unnecessarily. Therefore we use the SQL statistics functionality from Developer Studio and determine the standard deviation of each node in the cluster. You could customize this to either the nth-percentile, average or maximum connections if you like, but that last one could cause unnecessary scaling.

var endTime   = CmonDateTime::currentDateTime();
var startTime = endTime - 3600;
var stats     = host.sqlStats(startTime, endTime);
var config      = host.config();
var max_connections    = config.variable("max_connections")[0]['value'];

We retrieve the SQL statistics using the host.sqlStats function, and passing it a start- and endtime, we retrieve the configured maximum number of connections as well. The sqlStats function returns an array of maps containing all statistics collected during the period we selected. Since the statistical functions of Developer Studio expect arrays containing only values, the array of maps isn’t useable in this form. So we need to create a new array and copy all the values for the number of connections.

var connections = [];
for(stx = 0; stx < stats.size(); ++stx) {
    connections[stx] = stats[stx]['connections'];
}

Then we can calculate the connections used during our selected period of time and express that as an percentage:

stdev_connections_pct = (stdev(connections) / max_connections) * 100;
if(stdev_connections_pct > WARNING_THRESHOLD) {
    THRESHOLD_MET = true;
}

Once our threshold is met, we add a new node to our cluster and this is when we call the cmonrpc helper functions. However we only want to do this once during our run, hence we set the variable THRESHOLD_MET. At the very end, we also add an extra line of advice to show we are scaling out our cluster

if (THRESHOLD_MET == true)
{
    /* find unused node */
    node = findUnusedHost();
    addNode(node);

    advice = new CmonAdvice();
    advice.setTitle(TITLE);
    advice.setAdvice("Scaling out cluster with new node:"+ node);
    advice.setJustification("Scaling slave nodes is necessary");
    advisorMap[idx+1]= advice;
}

Conclusion

Obviously, there are still a few shortcomings with this advisor: it should obviously not run more frequently than the period used for the SQL statistics selection. In our example we set it to 1 hour of statistics, so do not run the advisor more frequently than once per hour.

Also the advisor will put extra stress on the master by copying its dataset to the new slave, so you better also keep an eye on the master node in your Master-Slave topology. The advisors are limited to a runtime of 30 seconds at this moment, so if there is a slow response in the curl calls, it could exceed the runtime if you use the cmonrpc library for other purposes.

On the good side, this advisor shows how easy you can use advisors beyond what they were designed for and use them to trigger actions. Examples of such actions could be the scheduling of backups or setting hints in your configuration management tool (Zookeeper/Consul). The possibilities with Developer Studio are almost only limited by your imagination!

The complete advisor:

#include "common/mysql_helper.js"
#include "common/cmonrpc.js"

var CMONRPC_HOST = 'localhost';
var CMONRPC_PORT = '9500';
var CMONRPC_TOKEN = ["test12345", "someothertoken"];
var FREE_HOSTS = ["10.10.19.12", "10.10.19.13", "10.10.19.14"];

/**
 * Checks the percentage of used connections and scales accordingly
 * 
 */ 
var WARNING_THRESHOLD=85;
var TITLE="Auto scaling read slaves";
var THRESHOLD_MET = false;
var msg = '';

function main()
{
    var hosts     = cluster::mySqlNodes();
    var advisorMap = {};

    for (idx = 0; idx < hosts.size(); ++idx)
    {
        host        = hosts[idx];
        map         = host.toMap();
        connected     = map["connected"];
        var advice = new CmonAdvice();
        var endTime   = CmonDateTime::currentDateTime();
        var startTime = endTime - 10 * 60;
        var stats     = host.sqlStats(startTime, endTime);
        var config      = host.config();
        var max_connections    = config.variable("max_connections")[0]['value'];
        var connections = [];

        if(!connected)
            continue;
        if(checkPrecond(host) && host.role() != 'master')
        {
            /* Fetch the stats on connections over our selection period */
            for(stx = 0; stx < stats.size(); ++stx)
                connections[stx] = stats[stx]['connections'];
            stdev_connections_pct = (stdev(connections) / max_connections) * 100;
            if(stdev_connections_pct > WARNING_THRESHOLD)
            {
                THRESHOLD_MET = true;
                msg = "Slave node";
                advice.setJustification("Percentage of connections used (" + stdev_connections_pct + ") above " + WARNING_THRESHOLD + " so we need to scale out slaves.");
                advice.setSeverity(Warning); 
            }
            else
            {
                msg = "Slave node";
                advice.setJustification("Connections used ok.");
                advice.setSeverity(Ok);
            }
        }
        else
        {
            if (host.role() == 'master')
            {
                msg = "Master node";
                advice.setJustification("Master node will not be taken into consideration");
                advice.setSeverity(Ok);  
            }
            else
            {
                msg = "Cluster is not okay and there is no data";
                advice.setJustification("there is not enough load on the server or the uptime is too little.");
                advice.setSeverity(Ok);
            }
        }

        advice.setHost(host);
        advice.setTitle(TITLE);
        advice.setAdvice(msg);
        advisorMap[idx]= advice;
    }

    if (THRESHOLD_MET == true)
    {
        /* find unused node */
        var node = findUnusedHost();
        addNode(node);

        advice = new CmonAdvice();
        advice.setTitle(TITLE);
        advice.setAdvice("Scaling out cluster with new node:"+ node);
        advice.setJustification("Scaling slave nodes is necessary");
        advisorMap[idx+1]= advice;
    }


    return advisorMap;
}

Planets9s - Watch the replay: how to upgrade to MySQL 5.7 - best practices

$
0
0

Welcome to this week’s Planets9s, covering all the latest resources and technologies we create around automation and management of open source databases.

Watch the replay: how to upgrade to MySQL 5.7 - best practices

Thanks to everyone who participated in this week’s live webinar on how to upgrade to MySQL 5.7. Amongst other things, we discussed important changes between versions 5.6 and 5.7 and how to best research, prepare and perform adequate tests before the time comes to finally start the upgrade. The replay is now online to watch at your own leisure.

Watch the replay

Introducing NinesControl: Your Database, Any Cloud

We recently announced NinesControl, a developer friendly service to deploy and manage MySQL, Percona, MariaDB and MongoDB clusters using your preferred Cloud Provider. NinesControl is specifically designed with developers in mind. It is currently in beta for DigitalOcean users, before we expand the service to other public cloud providers. We’re now inviting users to get an early look at the new NinesControl (beta).

Sign up up to stay informed and apply for early access

Automagically scale your MySQL topologies with ClusterControl Developer Studio

This new blog post describes how to automatically scale a MySQL Replication topology via advisors, written in the ClusterControl Developer Studio. We show you how you can keep an eye on performance and at the same time scale out the number of read slaves in your replication topology whenever it is necessary.

Read the blog

That’s it for this week! Feel free to share these resources with your colleagues and follow us in our social media channels.

Have a good end of the week,

Jean-Jérôme Schmidt
Planets9s Editor
Severalnines AB

Read-Write Splitting for Java Apps using Connector/J, MySQL Replication and HAProxy

$
0
0

In a previous post, we looked into load balancing for PHP apps and how to configure read-write splitting on MySQL Replication setups. The native PHP MySQL driver (php-mysqlnd_ms) would perform read/write splits, and the MySQL connections would be made on one of the two listeners of HAProxy.

In this post, we’ll play around with Java, Connector/J, MySQL Replication and HAProxy. One important thing to note is that, unlike php-mysqlnd_ms, Connector/J is aware of MySQL Replication but it does not automatically perform read-write splitting. We have to instruct the query statement in the code of our Java application to establish a so-called read operation, using a JDBC connection object as read-only. Then, the driver will redirect the query to one of the healthy slaves as defined in the JDBC connection string.

We are going to manually deploy a MariaDB Replication setup and add it into ClusterControl using “Add Existing Server/Cluster”. Then, we will deploy HAProxy with Keepalived, and create a simple Java application to connect to our Replication setup.

Why add HAProxy between Connector/J and MariaDB?

Since we are using MariaDB Server, we are going to use MariaDB Connector/J. Similar to MySQL Connector/J (MariaDB’s Connector/J also supports MySQL and vice versa), it supports various features like read/write master, failover or round-robin load balanced set of slaves. These features are configurable from the application via coding, and we want to eliminate that so the load balancer tier (HAProxy and Keepalived) is totally independent. The load balancer tier will take care of failover, load balancing, connection throttling, Virtual IP address and backend health checks. By doing this, we can minimize the hard-coded changes on the application side and reduce dependency between the layers. If you have multiple application/web servers that connect to a single replication setup, or the database servers are hosted in a dynamic environment that is constantly changing (e.g Docker, cloud instances), then this setup might be what you are looking for.

Our architecture looks like this:

Our simple Java application is hosted on the web server, and the JDBC driver will redirect writes to the HAProxy node on port 3307 while reads are redirected to port 3308. A hot-standby HAProxy instance is coupled with Keepalived to provide a virtual IP address. The web server connects to the virtual IP address on the respective port as a single access point to our MariaDB Replication setup. All database nodes in this setup are running on Debian 8 (Jessie).

Deploying a replicated master-slave MariaDB setup

  1. Let’s deploy our MariaDB setup. We used three hosts for this purpose, one master and two slaves. Install MariaDB server on each of the server:

    $ apt-get install software-properties-common
    $ apt-key adv --recv-keys --keyserver keyserver.ubuntu.com 0xcbcb082a1bb943db
    $ add-apt-repository 'deb [arch=amd64,i386] http://ossm.utm.my/mariadb/repo/10.1/debian jessie main'
    $ apt-get update
    $ apt-get install -y mariadb-server

    ** Enter the MySQL root password in the password dialog.

  2. Configure each MariaDB server with minimal recommended replication configuration. Firstly, create a new MariaDB configuration file at /etc/mysql/my.cnf:

    $ vi /etc/my.cnf

    And add following lines:

    mariadb1:

    [mysqld]
    bind-address=0.0.0.0
    gtid_domain_id=1
    log_bin=binlog
    log_slave_updates=1
    expire_logs_days=7
    server_id=1001
    binlog_format=ROW
    basedir=/usr
    datadir=/var/lib/mysql
    pid_file=mysql.pid
    socket=/var/run/mysqld/mysqld.sock

    mariadb2:

    [mysqld]
    bind-address=0.0.0.0
    gtid_domain_id=1
    log_bin=binlog
    log_slave_updates=1
    expire_logs_days=7
    server_id=1002
    binlog_format=ROW
    basedir=/usr
    datadir=/var/lib/mysql
    pid_file=mysql.pid
    socket=/var/run/mysqld/mysqld.sock

    mariadb3:

    [mysqld]
    bind-address=0.0.0.0
    gtid_domain_id=1
    log_bin=binlog
    log_slave_updates=1
    expire_logs_days=7
    server_id=1003
    binlog_format=ROW
    basedir=/usr
    datadir=/var/lib/mysql
    pid_file=mysql.pid
    socket=/var/run/mysqld/mysqld.sock
  3. Restart MariaDB to load the changes:

    $ systemctl restart mysql
  4. On mariadb1, create the replication slave user. Use mysql client to access the server:

    $ mysql -uroot -p

    And run the following statements:

    MariaDB [(none)]> GRANT REPLICATION SLAVE ON *.* TO ‘slave’@’%’ IDENTIFIED BY ‘slavepassword’;
    MariaDB [(none)]> FLUSH PRIVILEGES;
  5. Identify the MariaDB GTID value on mariadb1 by using the binlog_gtid_pos function:

    MariaDB [(none)]> show master status;
    +---------------+----------+--------------+------------------+
    | File          | Position | Binlog_Do_DB | Binlog_Ignore_DB |
    +---------------+----------+--------------+------------------+
    | binlog.000003 |      609 |              |                  |
    +---------------+----------+--------------+------------------+
    1 row in set (0.00 sec)
    
    MariaDB [(none)]>  SELECT binlog_gtid_pos('binlog.000003',609);
    +--------------------------------------+
    | binlog_gtid_pos('binlog.000003',609) |
    +--------------------------------------+
    | 1-1001-2                             |
    +--------------------------------------+

    The GTID position is 1-1001-2. We will use this value when setting up the slaves.

  6. On slaves (mariadb2 and mariadb3), run the following statements to start the slaves:

    MariaDB [(none)]> SET GLOBAL gtid_slave_pos = '1-1001-2';
    MariaDB [(none)]> CHANGE MASTER TO master_host='192.168.55.111', master_user='slave', master_password='slavepassword', master_use_gtid=slave_pos;
    MariaDB [(none)]> START SLAVE;
  7. Verify the slave status and ensure the value of Slave_IO_Running and Slave_SQL_Running is ‘Yes’:

    MariaDB [(none)]> SHOW SLAVE STATUS\G

Our Replication setup is now deployed.

Adding the Replication Setup into ClusterControl

  1. Install ClusterControl on ClusterControl server.

  2. Once installed, generate SSH keys and copy it to all nodes (including the ClusterControl server itself):

    $ ssh-keygen -t rsa
    $ ssh-copy-id 192.168.55.110 # ClusterControl + Haproxy #1
    $ ssh-copy-id 192.168.55.111 # mariadb1
    $ ssh-copy-id 192.168.55.112 # mariadb2
    $ ssh-copy-id 192.168.55.113 # mariadb3
    $ ssh-copy-id 192.168.55.101 # Haproxy #2
  3. Login to ClusterControl and go to “Add Existing Server/Cluster”. Specify the required details in the dialog:

    Click on ‘Add Cluster’ and wait for the job to complete.

    Once completed, you should see something like the below in the ClusterControl summary bar. You should see one master node and two slaves:

    Since our database is MariaDB, we are going to change some parameters so ClusterControl can handle Replication for MariaDB. Find the following lines inside /etc/cmon.d/cmon_1.cnf and change the value accordingly:

    type=replication
    vendor=mariadb

    Save the file and restart CMON service so it loads up the new configuration options:

    $ service cmon restart

    Go to ClusterControl > Settings > Cluster Registrations > Synchronize Cluster to load up the interface for Replication. You should now notice the changes, similar to the screenshot below:

Deploying HAProxy and Configuring Health Checks

Similar to the previous blog post, we are going to use the same custom health check script for MariaDB. This health check script produces a more accurate health check on the master and slave servers. The script detects the MySQL replication role on the database node as per below:

  • if master (SHOW SLAVE HOSTS > 1 AND read_only = OFF)
    • return 'MySQL master is running.'
  • if slave (Slave_IO_Running = Yes AND Slave_SQL_Running = Yes AND (Seconds_Behind_Master = 0 OR Seconds_Behind_Master < SLAVE_LAG_LIMIT))
    • return 'MySQL slave is running. (slave lag: 0)'
  • else
    • return 'MySQL is *down*'

Note that the assigned mysql user must have at least PROCESS, REPLICATION CLIENT and REPLICATION SLAVE privileges in order for the script to report correctly.

  1. Before the deployment begins, run the following command on the ClusterControl node to replace the health check template for MySQL Replication:

    $ wget https://raw.githubusercontent.com/ashraf-s9s/mysqlchk/master/mysqlchk.mysql -O /usr/share/cmon/templates/mysqlchk.mysql
  2. Now we are good to deploy the two HAProxy instances. Ensure the role for all nodes are set to Active and click on ‘Install HAProxy’ to start the installation:

    Repeat the above step for the second HAproxy node.

  3. To make HAProxy work with MySQL Replication, two HAProxy listeners (3307 for writes, 3308 for reads) are required. We also have to use tcp-check to distinguish whether the backend node is a healthy master or slave. To achieve this, we need to perform some modification to the installed HAProxy configuration file located at /etc/haproxy/haproxy.cfg of the load balancer nodes.

    Ensure you have the following configuration lines in haproxy.cfg on both load balancer nodes (don’t forget to replace the existing listener directive created by ClusterControl):

    listen  haproxy_192.168.55.110_3307
            bind *:3307
            mode tcp
            timeout client  10800s
            timeout server  10800s
            balance leastconn
            option tcp-check
            tcp-check expect string MySQL\ master
            option allbackups
            default-server port 9200 inter 2s downinter 5s rise 3 fall 2 slowstart 60s maxconn 64 maxqueue 128 weight 100
            server mariadb1 192.168.55.111:3306 check
            server mariadb2 192.168.55.112:3306 check
            server mariadb3 192.168.55.113:3306 check
     
    listen  haproxy_192.168.55.110_3308
            bind *:3308
            mode tcp
            timeout client  10800s
            timeout server  10800s
            balance leastconn
            option tcp-check
            tcp-check expect string is\ running.
            option allbackups
            default-server port 9200 inter 2s downinter 5s rise 3 fall 2 slowstart 60s maxconn 64 maxqueue 128 weight 100
            server mariadb1 192.168.55.111:3306 check
            server mariadb2 192.168.55.112:3306 check
            server mariadb3 192.168.55.113:3306 check

    ** The use of ‘option tcp-check’ and ‘tcp-check expect’ is vital here. This is how HAProxy is capable of routing the incoming query to the correct backend server. Writes are redirected to the node which report ‘MySQL master is running’ (therefore the expected string is “MySQL\ master”). Reads are redirected to the nodes which contain “is\ running” in the return string, to include master (‘MySQL master is running’) and all slaves (‘MySQL slave is running’) in the read-only load balancing set.

    Restart HAProxy service to load it up:

    $ systemctl restart haproxy

    To verify, go to ClusterControl > Nodes > choose one of the load balancer node, and you should see something like below:

  4. Then, deploy Keepalived with virtual IP address 192.168.55.100 via ClusterControl > Actions > Add Load Balancer > Install Keepalived:

    At this point, all nodes have been deployed correctly - as indicated by the green ticks in the summary bar:

Database and load balancer tiers are now deployed. Let’s move to the application tier.

Deploying Application and MariaDB Connector/J

In this example, we wrote a simple Java application that can read/write to our MariaDB setup. The connection string for replication format is “jdbc:mysql:replication://master,slave1,slave2,slave3/database”, assumes that the first (and only the first) host is the master and the rest are slaves. We also need to install MariaDB Connector/J before the application can connect to the database.

To perform read-write splitting, we have to use the setReadOnly method. If the connection object with Connection.setReadOnly(false) is called, connection will be established on the available master, while Connection.setReadOnly(true) will be established to the available slave(s), throwing an SQLException if it cannot establish a connection to a slave, unless the property readFromMasterWhenNoSlaves is set to be “true”.

  1. Install Java and required packages:

    $ yum install -y java-1.8.0-openjdk java-1.8.0-openjdk-devel
  2. On the master node (mariadb1), create a database, a database user and a table, java.tbl_test:

    $ mysql -uroot -p -h192.168.55.111 -P3306

    And run the following statements:

    MariaDB> CREATE SCHEMA java;
    MariaDB> GRANT ALL PRIVILEGES ON java.* to java@’%’ IDENTIFIED BY ‘password’;
    MariaDB> CREATE TABLE tbl_test (id INT PRIMARY KEY AUTO_INCREMENT, data INT);
  3. Create an application directory and a file called ExampleReadWrite.java:

    $ mkdir -p /root/java-apps
    $ vi /root/java-apps/ExampleReadWrite.java

    And paste the following lines into it:

    import java.sql.*;
    
    public class ExampleReadWrite {
     // JDBC driver name and database URL                                                                    
     static final String JDBC_DRIVER = "org.mariadb.jdbc.Driver";
     static final String DB_URL = "jdbc:mysql:replication://192.168.55.100:3307,192.168.55.100:3308/java";
    
     // Database credentials                                                                                
     static final String USER = "java";
     static final String PASS = "password";
    
     public static void main(String[] args) {
      Connection conn = null;
      Statement stmt = null;
      try {
       // Register JDBC driver                                                                       
       Class.forName("org.mariadb.jdbc.Driver");
    
       // Open a connection                                                                          
       while (true) {
        conn = DriverManager.getConnection(DB_URL, USER, PASS);
        stmt = conn.createStatement();
    
        String insert_sql = "INSERT INTO tbl_test (data) VALUES (1)";
        String get_hostname = "SELECT @@hostname";
        String read_sql = "SELECT @@hostname AS hostname, count(id) AS count FROM tbl_test";
    
        // Turn off readonly so write is forwarded to master - HAProxy port 3307
        conn.setReadOnly(false);
        conn.setAutoCommit(false);
        ResultSet hrs = stmt.executeQuery(get_hostname);
        stmt.executeUpdate(insert_sql);
        conn.commit();
    
        if (hrs.next()) {
         String write_hostname = hrs.getString(1);
         System.out.println("[WRITE] Hostname: " + write_hostname);
        }
    
        // Turn on readonly so read is forwarded to master/slave(s) - HAProxy port 3308
        conn.setReadOnly(true);
        ResultSet rs = stmt.executeQuery(read_sql);
    
        while (rs.next()) {
         String hostname = rs.getString("hostname");
         int row_count = rs.getInt("count");
         System.out.println("[READ ] Hostname: " + hostname + " | Row counts: " + row_count);
         System.out.println("");
        }
        rs.close();
        stmt.close();
        conn.close();
        // Pause for 2 seconds before loop
        Thread.sleep(2000);
       }
    
      } catch (SQLException se) {
       se.printStackTrace();
      } catch (Exception e) {
       e.printStackTrace();
      } finally {
       try {
        if (stmt != null)
         stmt.close();
       } catch (SQLException se2) {}
       try {
        if (conn != null)
         conn.close();
       } catch (SQLException se) {
        se.printStackTrace();
       }
      }
      System.out.println("Goodbye!");
     }
    }
  4. Download and install MariaDB Connector/J JAR file from this page (registration required) inside the application directory. Then, set the location of the JAR file into CLASSPATH environment so Java can load it:

    $ cd /root/java-apps
    $ wget https://downloads.mariadb.com/enterprise/zdkv-r01a/connectors/java/connector-java-1.3.6/mariadb-java-client-1.3.6.jar
    $ export CLASSPATH=/root/java-apps/mariadb-java-client-1.3.6.jar:$CLASSPATH
  5. Compile the source:

    $ javac ExampleReadWrite.java
  6. Let’s run the application:

    $ java ExampleReadWrite
    [WRITE] Hostname: mariadb1.local
    [READ ] Hostname: mariadb1.local | Row counts: 124
    
    [WRITE] Hostname: mariadb1.local
    [READ ] Hostname: mariadb2.local | Row counts: 125
    
    [WRITE] Hostname: mariadb1.local
    [READ ] Hostname: mariadb3.local | Row counts: 126
    
    [WRITE] Hostname: mariadb1.local
    [READ ] Hostname: mariadb1.local | Row counts: 127
    
    [WRITE] Hostname: mariadb1.local
    [READ ] Hostname: mariadb2.local | Row counts: 128
    
    [WRITE] Hostname: mariadb1.local
    [READ ] Hostname: mariadb3.local | Row counts: 129
    
    [WRITE] Hostname: mariadb1.local
    [READ ] Hostname: mariadb1.local | Row counts: 130

    From the application’s output, we can see that writes will always go to master (mariadb1.local) while reads are distributed evenly to all nodes (slaves + master), based on the leastconn algorithm specified in the HAProxy configuration.

    You can also access the HAProxy admin page available at http://[clustercontrol_server]:9600/ with default username/password is “admin”:

    Note that in this example, no connection pooling is configured for our Java apps.

Connection Pooling + HAProxy

Connection pooling is popular in Java since it can significantly increase the performance of your Java application, while reducing overall resource usage. After a connection is created, it is placed in the pool and it is used again so that a new connection does not have to be established. If all the connections are being used, a new connection is made and is added to the pool. Connection pooling also cuts down on the amount of time a user must wait to establish a connection to the database.

On the other hand, HAProxy is pretty good in forwarding raw TCP packets where connections are created and then closed. Due to this, HAProxy is usually configured with low timeout values. Common practice if using connection pooling with HAProxy is to configure the timeout client, timeout connect and timeout server variables to be the same value as the timeout value configured in the connection pool. Also, the value of HAProxy’s maxconn must be equal to or greater than the maximum number of database connections in the pool.

That’s it. You are now set with a more resilient architecture of your Java apps on top of Replication setups.


How ProxySQL adds Failover and Query Control to your MySQL Replication Setup

$
0
0

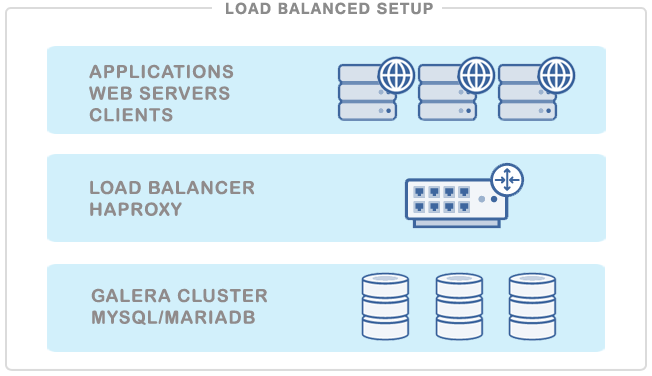
In a previous blog post, we discussed the installation of ProxySQL and its configuration system. In today’s post, we’ll set up ProxySQL to work in a MySQL Replication environment managed by  ClusterControl. We will take a look at the metrics it provides to a DBA, and how this data can be used to ensure smooth operations.

Why ProxySQL?

This is very valid question most of you are probably asking. You either already are using some kind of proxy layer (be it HAProxy or MaxScale perhaps), or you have concluded that you don’t really need a proxy layer in your setup. Why bother try and test another proxy? How can it help you in your daily operations?

ProxySQL’s biggest advantage is this - it is a piece of software created by DBA’s, for DBA’s. It’s aim is to help with common, sometimes very frustrating problems. Have you ever been in a situation where a not optimal an awful query was killing your databases, yet you could not do anything about it because it needed to be modified in the application that is maintained by somebody else? Have you been asked to diagnose issues caused by database nodes that constantly switch between online and offline? Have you ever wanted a way to see your query traffic, almost in real time, without a need to collect the data first (from slow logs or tcpdump) and then process it? Or maybe you’d like to execute graceful switchovers and failovers, as your application does not handle broken transactions well? ProxySQL can assist in such cases.

Setting up ProxySQL to work with MySQL replication

Define hostgroups

As we described in this previous post, ProxySQL uses a concept of hostgroups - a group of different backends which serve the same purpose or handle similar type of traffic. When it comes to replication, at a minimum two types of backends come to mind - a master, which handles writes (and also reads, if needed) and slave (or slaves), which handles read-only traffic. In this example we are not going to need anything more than those two hostgroups. To create them, we need to connect to the ProxySQL management interface and run queries like this:

MySQL [(none)]> INSERT INTO mysql_servers (hostgroup_id, hostname, port, max_replication_lag) VALUES (0, '172.30.4.120', 3306, 20);
Query OK, 1 row affected (0.00 sec)

MySQL [(none)]> INSERT INTO mysql_servers (hostgroup_id, hostname, port, max_replication_lag) VALUES (1, '172.30.4.113', 3306, 20);
Query OK, 1 row affected (0.00 sec)

MySQL [(none)]> INSERT INTO mysql_servers (hostgroup_id, hostname, port, max_replication_lag) VALUES (1, '172.30.4.181', 3306, 20);
Query OK, 1 row affected (0.00 sec)

What we did here was to create three backends, 172.30.4.120, 172.30.4.113 and 172.30.4.189. The first of them was assigned to hostgroup ‘0’, as this host acts as a master. Therefore this hostgroup will be our ‘write’ hostgroup. Remaining hosts were assigned to a hostgroup ‘1’, which will be used to store our slaves. Please note we did set the max_replication_lag setting which means that slaves with a lag greater than 20 will be shunned in the proxy and traffic won’t be directed to them. This creates a possibility that neither of our slaves will be available for the read-only traffic. Therefore we need to make one more step:

MySQL [(none)]> INSERT INTO mysql_servers (hostgroup_id, hostname, port, max_replication_lag) VALUES (1, '172.30.4.113', 3306, 20);
Query OK, 1 row affected (0.01 sec)

We’ve added our master, 172.30.4.113 to the ‘read-only’ hostgroup - we want it to be there in case none of the slaves are available due to high replication lag. Obviously, our master won’t be affected by lag, therefore it will always be available.

What we could also have done is to set different weights between .113 and the remaining hosts - this would keep our master almost free of the read-only traffic as long as one of the slaves is available. This would require changes in the weight settings after the failover (low weight has to be set on the new master and regular, higher weight would have to be set on the old master. Unfortunately, at the time of writing, ClusterControl does not support setting these weights. Therefore we will have to accept an evenly split read-only traffic across all nodes in the topology.

Define application users

Next required step would be to create users in ProxySQL. ProxySQL works as a proxy - application connects to it, authenticates against it and then ProxySQL finds a suitable connection to the backend (that matches user, schema, collation and some other parameters). If such connection does not exists, ProxySQL opens a new one. The point is that the application talks only to the proxy. Therefore ProxySQL has to have a list of users which are allowed to connect to the database. Our application will use a single user:

MySQL [(none)]> INSERT INTO mysql_users (username, password, active, default_hostgroup, max_connections) VAL
UES ('sbtest', 'sbtest', 1, 0, 200);
Query OK, 1 row affected (0.00 sec)

What we did here was to create an user ‘sbtest’ with password of ‘sbtest’. We set the user as ‘active’ and we also set the maximum number of connections for this user to 200. Very important bit is the default hostgroup. As we discussed in the previous post, ProxySQL uses a chain of query rules to figure out the routing. If none of the rules apply to a query, query will be routed to the default hostgroup for the user, which created the connection. In our case all queries executed by user ‘sbtest’ which won’t match any of the query rules (which we are going to create in next step), will be routed to the hostgroup ‘0’ - our ‘write’ hostgroup.

Define query rules

As mentioned earlier, ProxySQL uses query rules to route traffic. Those rules can create  complex chains and distribute traffic across multiple hostgroups. In our case there’s no need for too much complexity - what we want is to route all SELECTs except for SELECT ... FOR UPDATE to a ‘reader’ hostgroup (‘1’ in our case) and route remaining traffic (DDL, DML, anything else than SELECT) to the master. Rules are located in ‘mysql_query_rules’ table which is parsed similarly to iptables chains - starting from the first rule, trying to match a query. If a rule doesn’t match, the query is tested against another one. If there is no match, the query is routed to the default hostgroup for the user that executed a query.

In our case two rules are needed. First one:

MySQL [(none)]> INSERT INTO mysql_query_rules (active, match_pattern, destination_hostgroup, cache_ttl) VALUES (1, '^SELECT .* FOR UPDATE', 0, NULL);
Query OK, 1 row affected (0.00 sec)

We are checking if the query is not by chance a SELECT … FOR UPDATE. If it is, we want it to be routed to hostgroup ‘0’ - our ‘writer’ hostgroup. If a query is not SELECT … FOR UPDATE, we’ll check another rule:

MySQL [(none)]> INSERT INTO mysql_query_rules (active, match_pattern, destination_hostgroup, cache_ttl) VALUES (1, '^SELECT .*', 1, NULL);
Query OK, 1 row affected (0.00 sec)

Here we are checking if a query is a regular SELECT. If so, it’ll be routed to hostgroup ‘1’ - our ‘reader’ hostgroup. If not, there are no more rules in the chain so the default hostgroup for our application user will be used (hostgroup ‘0’).

Setting up the monitoring module and healthcheck timeout

In this step we are going to setup the correct access credentials for the ProxySQL monitoring module. We are also going to change some of default timeouts related to the healthchecks executed by ProxySQL. As we wrote in the previous blog post, the monitoring module in ProxySQL does not take part in checking the health of the nodes. It will be needed in our case, though - we’ve set a limit for the maximal replication lag we can accept. We will also want ProxySQL to watch read_only flags in order to understand topology changes invoked by ClusterControl. Both those features require that you correctly setup the monitoring module.

We start first with creating a user on our master host - this user will be used by the monitoring module:

mysql> GRANT REPLICATION CLIENT ON *.* TO monuser@172.30.4.90 IDENTIFIED BY 'monpass';
Query OK, 0 rows affected (0.00 sec)

Next, we need to set the correct user and password to the monitoring module. In the past, UPDATE on ‘global_variables’ table was the only way to change settings in ProxySQL. Recently, support for more ‘MySQLish’ way of setting variables was added and MySQL DBA’s can benefit from another syntax that’s imprinted in their consciousness: SET variable = ‘value’

mysql> SET mysql-monitor_username='monuser';
Query OK, 1 row affected (0.00 sec)

mysql> SET mysql-monitor_password='monpass';
Query OK, 1 row affected (0.00 sec)

Finally, we want to update 'mysql-connect_timeout_server_max' to 20 seconds (20000 milliseconds).

mysql> SET mysql-connect_timeout_server_max=20000;
Query OK, 1 row affected (0.01 sec)

We want ClusterControl to manage the failover and the failover process (unless something went very bad) takes between 10 and 20 seconds. ProxySQL has to be able to wait up to 20 seconds to allow the failover to be graceful.

Define ‘read’ and ’write’ hostgroups and load the new configuration

Here, the final steps needed to complete our setup. We need to let ProxySQL know to which hostgroups our slaves (hosts with read_only=1) and masters (hosts with read_only=0) should belong. We do this by adding an entry to the ‘mysql_replication_hostgroups’ table:

MySQL [(none)]> INSERT INTO mysql_replication_hostgroups (writer_hostgroup, reader_hostgroup) VALUES (0, 1);
Query OK, 1 row affected (0.00 sec)

As you may remember from our previous blog post, ProxySQL does not update runtime configuration when you make a change - you need to explicitly load them. If you want to have them persistent, you also want to save them to disk. We need to do these steps now.

First, changes in mysql_users:

MySQL [(none)]> LOAD MYSQL USERS TO RUNTIME;
Query OK, 0 rows affected (0.00 sec)

MySQL [(none)]> SAVE MYSQL USERS TO DISK;
Query OK, 0 rows affected (0.03 sec)

Next, query rules:

MySQL [(none)]> LOAD MYSQL QUERY RULES TO RUNTIME;
Query OK, 0 rows affected (0.00 sec)

MySQL [(none)]> SAVE MYSQL QUERY RULES TO DISK;
Query OK, 0 rows affected (0.05 sec)

Variables:

MySQL [(none)]> LOAD MYSQL VARIABLES TO RUNTIME;
Query OK, 0 rows affected (0.00 sec)

MySQL [(none)]> SAVE MYSQL VARIABLES TO DISK;
Query OK, 54 rows affected (0.02 sec)

And finally, mysql_servers and mysql_replication_hostgroups:

MySQL [(none)]> LOAD MYSQL SERVERS TO RUNTIME;
Query OK, 0 rows affected (0.01 sec)

MySQL [(none)]> SAVE MYSQL SERVERS TO DISK;
Query OK, 0 rows affected (0.08 sec)

The order is not very important, but there is one single notable exception - you want to make sure that all changes in variables are loaded ‘to runtime’ and monitoring users have been created on the MySQL side before you apply changes to mysql_replication_hostgroups. Applying changes to this table starts the ‘topology detection’ mechanism which will change your mysql_servers table if it’s not able to connect to backends - and this can happen only after access credentials have been set in the ProxySQL variables.

At this point, your proxy is ready to handle switchovers executed using ClusterControl. Let’s take a look at how it works.

Real world issues ProxySQL can help you to solve

Graceful switchover

In this example we’ll use sysbench as our ‘application’ - it’s good enough for that. Traffic will be generated and we’ll be watching the progress every second.

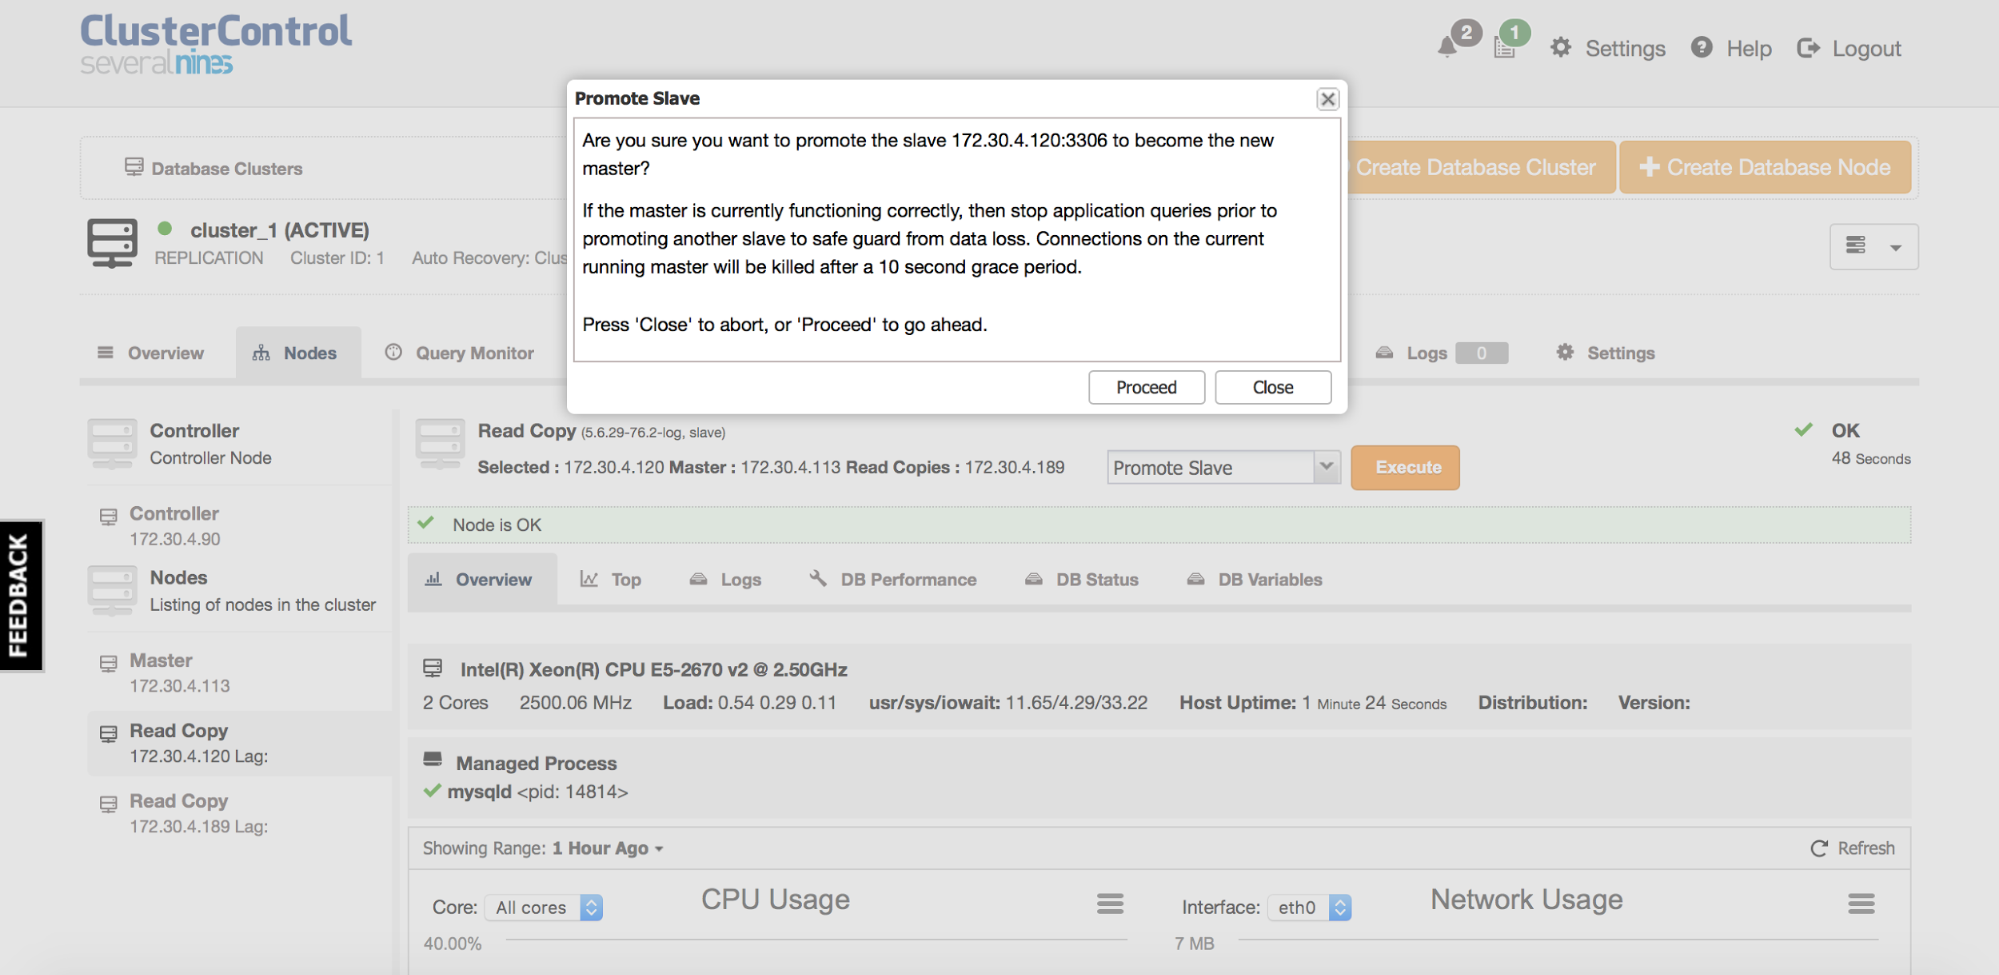
To accomplish switchover, all you need to do is to initiate it from the ClusterControl (Nodes tab -> choose a slave -> Promote Slave)

[ 237s] threads: 6, tps: 0.00, reads: 4385.89, writes: 1256.97, response time: 45.89ms (95%), errors: 0.00, reconnects:  0.00
[ 238s] threads: 6, tps: 0.00, reads: 2208.06, writes: 631.02, response time: 161.20ms (95%), errors: 0.00, reconnects:  0.00
[ 239s] threads: 6, tps: 0.00, reads: 4275.01, writes: 1225.00, response time: 75.14ms (95%), errors: 0.00, reconnects:  0.00
[ 240s] threads: 6, tps: 0.00, reads: 479.00, writes: 124.00, response time: 16.76ms (95%), errors: 0.00, reconnects:  0.00
[ 241s] threads: 6, tps: 0.00, reads: 0.00, writes: 0.00, response time: 0.00ms (95%), errors: 0.00, reconnects:  0.00
[ 242s] threads: 6, tps: 0.00, reads: 0.00, writes: 0.00, response time: 0.00ms (95%), errors: 0.00, reconnects:  0.00
[ 243s] threads: 6, tps: 0.00, reads: 0.00, writes: 0.00, response time: 0.00ms (95%), errors: 0.00, reconnects:  0.00
[ 244s] threads: 6, tps: 0.00, reads: 0.00, writes: 0.00, response time: 0.00ms (95%), errors: 0.00, reconnects:  0.00
[ 245s] threads: 6, tps: 0.00, reads: 0.00, writes: 0.00, response time: 0.00ms (95%), errors: 0.00, reconnects:  0.00
[ 246s] threads: 6, tps: 0.00, reads: 0.00, writes: 0.00, response time: 0.00ms (95%), errors: 0.00, reconnects:  0.00
[ 247s] threads: 6, tps: 0.00, reads: 0.00, writes: 0.00, response time: 0.00ms (95%), errors: 0.00, reconnects:  0.00
[ 248s] threads: 6, tps: 0.00, reads: 0.00, writes: 0.00, response time: 0.00ms (95%), errors: 0.00, reconnects:  0.00
[ 249s] threads: 6, tps: 0.00, reads: 0.00, writes: 0.00, response time: 0.00ms (95%), errors: 0.00, reconnects:  0.00
[ 250s] threads: 6, tps: 0.00, reads: 0.00, writes: 0.00, response time: 0.00ms (95%), errors: 0.00, reconnects:  0.00
[ 251s] threads: 6, tps: 0.00, reads: 0.00, writes: 0.00, response time: 0.00ms (95%), errors: 0.00, reconnects:  0.00
[ 252s] threads: 6, tps: 0.00, reads: 0.00, writes: 0.00, response time: 0.00ms (95%), errors: 0.00, reconnects:  0.00
^@[ 253s] threads: 6, tps: 0.00, reads: 0.00, writes: 0.00, response time: 0.00ms (95%), errors: 0.00, reconnects:  0.00
[ 254s] threads: 6, tps: 0.00, reads: 0.00, writes: 0.00, response time: 0.00ms (95%), errors: 0.00, reconnects:  0.00
[ 255s] threads: 6, tps: 0.00, reads: 0.00, writes: 0.00, response time: 0.00ms (95%), errors: 0.00, reconnects:  0.00
[ 256s] threads: 6, tps: 0.00, reads: 0.00, writes: 0.00, response time: 0.00ms (95%), errors: 0.00, reconnects:  0.00
[ 257s] threads: 6, tps: 0.00, reads: 3285.09, writes: 951.03, response time: 17.65ms (95%), errors: 0.00, reconnects:  0.00
[ 258s] threads: 6, tps: 0.00, reads: 5630.94, writes: 1608.98, response time: 22.25ms (95%), errors: 0.00, reconnects:  0.00
[ 259s] threads: 6, tps: 0.00, reads: 6018.01, writes: 1713.00, response time: 16.76ms (95%), errors: 0.00, reconnects:  0.00

As you can see, no error happened and no transaction had to be rolled back - our application stalled for roughly 16 seconds but except for that, there was no impact whatsoever. Those 16 seconds are a result of how ClusterControl does the switchover - we allow some time for open transactions to close, to make sure ClusterControl won’t kill your queries as long as it’s not really necessary.

Graceful failover

ProxySQL, when configured as shown in this post, can handle (out of the box) failovers initiated by external tools. ClusterControl, at the time of writing does not support automated failover for MySQL Replication (we are working on this feature so it should become available in the next version) therefore we used another tool, MHA, to showcase this feature.

Detailed guide on setting up MHA is out of the scope of this blog post. We used the following configuration which should work with most ClusterControl deployments out of the box. This is not a production-grade configuration. You should define at least a secondary check script, to make sure you can check the status of the cluster using another way than direct SSH. You may also need to define a shutdown script or IP failover script if you use some kind of virtual IP pointing to your master. Having said that, this particular configuration will do for our demo.

[server default]
# mysql user and password
user=cmon
password=cmon
ssh_user=root
# working directory on the manager
manager_workdir=/var/log/masterha/s9s_app
# working directory on MySQL servers
remote_workdir=/var/log/masterha/s9s_app

[server1]
hostname=172.30.4.113

[server2]
hostname=172.30.4.120

[server3]
hostname=172.30.4.189

As a next step, we’ve started MHA manager:

root@ip-172-30-4-90:~# masterha_manager --conf /etc/s9s_app.cnf

Fri Mar 25 19:51:50 2016 - [info]
172.30.4.120(172.30.4.120:3306) (current master)
 +--172.30.4.113(172.30.4.113:3306)
 +--172.30.4.189(172.30.4.189:3306)

Fri Mar 25 19:51:50 2016 - [warning] master_ip_failover_script is not defined.
Fri Mar 25 19:51:50 2016 - [warning] shutdown_script is not defined.
Fri Mar 25 19:51:50 2016 - [info] Set master ping interval 3 seconds.
Fri Mar 25 19:51:50 2016 - [warning] secondary_check_script is not defined. It is highly recommended setting it to check master reachability from two or more routes.
Fri Mar 25 19:51:50 2016 - [info] Starting ping health check on 172.30.4.120(172.30.4.120:3306)..
Fri Mar 25 19:51:50 2016 - [info] Ping(SELECT) succeeded, waiting until MySQL doesn't respond..

And then we killed the master while running our ‘application’ - sysbench.

root@ip-172-30-4-120:~# killall -9 mysqld mysqld_safe

Failover happened, as expected:

Fri Mar 25 20:18:16 2016 - [info] Master failover to 172.30.4.113(172.30.4.113:3306) completed successfully.
Fri Mar 25 20:18:16 2016 - [info]

----- Failover Report -----

s9s_app: MySQL Master failover 172.30.4.120(172.30.4.120:3306) to 172.30.4.113(172.30.4.113:3306) succeeded

And our application experienced only a couple of seconds of latency spike - no single error was returned and no transaction had to be rolled back. Of course, your mileage may vary - graceful failover was possible only because there were no explicit transactions in our ‘application’. If there were any, those would have failed - you cannot begin a transaction on one host and complete it on another - this obviously won’t work, therefore some rollbacks would have to happen. If you use single statements in auto_commit mode, though, ProxySQL can route them to different hosts.

[ 160s] threads: 6, tps: 0.00, reads: 962.96, writes: 273.70, response time: 123.10ms (95%), errors: 0.00, reconnects:  0.00
[ 161s] threads: 6, tps: 0.00, reads: 86.09, writes: 18.02, response time: 129.72ms (95%), errors: 0.00, reconnects:  0.00
[ 162s] threads: 6, tps: 0.00, reads: 0.00, writes: 0.00, response time: 0.00ms (95%), errors: 0.00, reconnects:  0.00
[ 163s] threads: 6, tps: 0.00, reads: 0.00, writes: 0.00, response time: 0.00ms (95%), errors: 0.00, reconnects:  0.00
[ 164s] threads: 6, tps: 0.00, reads: 0.00, writes: 0.00, response time: 0.00ms (95%), errors: 0.00, reconnects:  0.00
[ 165s] threads: 6, tps: 0.00, reads: 0.00, writes: 0.00, response time: 0.00ms (95%), errors: 0.00, reconnects:  0.00
[ 166s] threads: 6, tps: 0.00, reads: 0.00, writes: 0.00, response time: 0.00ms (95%), errors: 0.00, reconnects:  0.00
[ 167s] threads: 6, tps: 0.00, reads: 0.00, writes: 0.00, response time: 0.00ms (95%), errors: 0.00, reconnects:  0.00
[ 168s] threads: 6, tps: 0.00, reads: 0.00, writes: 0.00, response time: 0.00ms (95%), errors: 0.00, reconnects:  0.00
[ 169s] threads: 6, tps: 0.00, reads: 0.00, writes: 0.00, response time: 0.00ms (95%), errors: 0.00, reconnects:  0.00
[ 170s] threads: 6, tps: 0.00, reads: 0.00, writes: 0.00, response time: 0.00ms (95%), errors: 0.00, reconnects:  0.00
[ 171s] threads: 6, tps: 0.00, reads: 233.28, writes: 75.77, response time: 10724.58ms (95%), errors: 0.00, reconnects:  0.00
[ 172s] threads: 6, tps: 0.00, reads: 849.21, writes: 245.75, response time: 208.91ms (95%), errors: 0.00, reconnects:  0.00
[ 173s] threads: 6, tps: 0.00, reads: 791.15, writes: 228.75, response time: 219.02ms (95%), errors: 0.00, reconnects:  0.00

Query caching

Query caching is always tricky and requires a significant dose of caution. Every query which is cached may return stale data and this may or may not be acceptable to the application. MySQL query cache is available since a long time but it’s far from being a perfect solution. It tends to serialize the workload, it is virtually not usable if you do lots of writes to a table - the relevant cache entries are invalidated very often. In short, it’s not a solution you can use when you are concerned about performance. There are different methods to implement a cache layer in a MySQL environment, but the most popular ones (except MySQL query cache) involve some external solutions (memcached, Redis, Couchbase) and application logic (connect to those databases, retrieve data, insert new data, handle some logic around it). This usually requires the DBA to interact with developers to make a change in this system (unless a DBA is also a developer).

Let’s try to imagine a situation where you, as a DBA, detects a significant increase in the database load. Load is triggered by non-optimal SELECT query. You contacted your developers and confirmed the query can be cached for, let’s say, five seconds. Sounds good to you, but you need to wait until the code is changed, built into a new release, then through the testing process before it is pushed to production. This may take a while, leaving you with overloaded, hot database servers for a day or two. Doesn’t sound good.

ProxySQL can help here. Let’s check our top 10 slow queries using stats_mysql_query_digest table:

MySQL [(none)]> select hostgroup, digest_text, count_star, sum_time, min_time, max_time from stats_mysql_query_digest order by sum_time desc LIMIT 10;
+-----------+-----------------------------------+------------+----------+----------+----------+
| hostgroup | digest_text                       | count_star | sum_time | min_time | max_time |
+-----------+-----------------------------------+------------+----------+----------+----------+
| 1         | SELECT c FROM sbtest23 WHERE id=? | 26412      | 45799998 | 339      | 1801122  |
| 1         | SELECT c FROM sbtest2 WHERE id=?  | 26930      | 45750637 | 333      | 902436   |
| 1         | SELECT c FROM sbtest10 WHERE id=? | 27690      | 45566636 | 336      | 483648   |
| 1         | SELECT c FROM sbtest32 WHERE id=? | 26630      | 45442794 | 336      | 1828579  |
| 1         | SELECT c FROM sbtest26 WHERE id=? | 27040      | 44605656 | 336      | 283511   |
| 1         | SELECT c FROM sbtest7 WHERE id=?  | 26590      | 43984049 | 335      | 679433   |
| 1         | SELECT c FROM sbtest4 WHERE id=?  | 26380      | 43932585 | 335      | 274789   |
| 1         | SELECT c FROM sbtest1 WHERE id=?  | 26520      | 43899458 | 333      | 208173   |
| 1         | SELECT c FROM sbtest17 WHERE id=? | 26270      | 43629776 | 331      | 944539   |
| 1         | SELECT c FROM sbtest30 WHERE id=? | 26410      | 43546491 | 331      | 274292   |
+-----------+-----------------------------------+------------+----------+----------+----------+
10 rows in set (0.00 sec)

As you can see, all of them follow the same pattern, it’s just the table that is different. What we can do now is to create a new rule for this particular type of query and then let ProxySQL cache it for some time.

MySQL [(none)]> INSERT INTO mysql_query_rules (active, match_pattern, destination_hostgroup, cache_ttl, apply) VALUES (1, '^SELECT c FROM sbtest[0-9]{1,2} WHERE id=.*', 1, 1000, 1);
Query OK, 1 row affected (0.00 sec)

MySQL [(none)]> LOAD MYSQL QUERY RULES TO RUNTIME;
Query OK, 0 rows affected (0.00 sec)

What we did here was to add an active rule, we passed a regex pattern matching our queries. We also set cache_ttl to 1000ms and we enabled the ‘apply’ flag which means that no further rule will be checked for queries which match the pattern. Now, let’s check if there are queries which matched this rule:

MySQL [(none)]> SELECT rule_id, match_pattern, hits FROM mysql_query_rules LEFT JOIN stats_mysql_query_rules USING (rule_id);
+---------+---------------------------------------------+--------+
| rule_id | match_pattern                               | hits   |
+---------+---------------------------------------------+--------+
| 3       | ^SELECT .* FOR UPDATE                       | 0      |
| 4       | ^SELECT .*                                  | 157916 |
| 5       | ^SELECT c FROM sbtest[0-9]{1,2} WHERE id=.* | 112793 |
+---------+---------------------------------------------+--------+
3 rows in set (0.00 sec)

As we can see, our rule is being used. Let’s see what are the results. We need to first reset the contents of the stats_mysql_query_digest table, wait a bit and then check its contents:

MySQL [(none)]> select hostgroup, digest_text, count_star, sum_time, min_time, max_time from stats_mysql_query_digest_reset order by sum_time desc LIMIT 0;
Empty set (0.01 sec)

MySQL [(none)]> select hostgroup, digest_text, count_star, sum_time, min_time, max_time from stats_mysql_query_digest order by sum_time desc LIMIT 10;
+-----------+-----------------------------------------------------------------------+------------+----------+----------+----------+
| hostgroup | digest_text                                                           | count_star | sum_time | min_time | max_time |
+-----------+-----------------------------------------------------------------------+------------+----------+----------+----------+
| 0         | UPDATE sbtest19 SET k=k+? WHERE id=?                                  | 34         | 1910928  | 428      | 1851831  |
| 1         | SELECT DISTINCT c FROM sbtest23 WHERE id BETWEEN ? AND ?+? ORDER BY c | 37         | 1849728  | 841      | 1715976  |
| 1         | SELECT DISTINCT c FROM sbtest17 WHERE id BETWEEN ? AND ?+? ORDER BY c | 33         | 1013140  | 868      | 843474   |
| 0         | UPDATE sbtest32 SET c=? WHERE id=?                                    | 30         | 911134   | 435      | 837739   |
| 1         | SELECT c FROM sbtest1 WHERE id BETWEEN ? AND ?+? ORDER BY c           | 38         | 768206   | 608      | 635686   |
| 1         | SELECT c FROM sbtest4 WHERE id BETWEEN ? AND ?+?                      | 40         | 405373   | 577      | 287515   |
| 1         | SELECT DISTINCT c FROM sbtest3 WHERE id BETWEEN ? AND ?+? ORDER BY c  | 41         | 373227   | 842      | 225387   |
| 1         | SELECT SUM(K) FROM sbtest32 WHERE id BETWEEN ? AND ?+?                | 29         | 348709   | 439      | 303660   |
| 1         | SELECT c FROM sbtest7 WHERE id BETWEEN ? AND ?+? ORDER BY c           | 33         | 336446   | 603      | 169885   |
| 1         | SELECT c FROM sbtest27 WHERE id BETWEEN ? AND ?+?                     | 49         | 296659   | 537      | 103047   |
+-----------+-----------------------------------------------------------------------+------------+----------+----------+----------+
10 rows in set (0.00 sec)

As expected, our problematic query is gone.

We can’t stress it enough - you have to be sure you can cache a query before you enable the cache in ProxySQL. Additionally, at this moment it’s more of a stub than full functionality - it lacks some features like limiting memory utilization. It definitely won’t replace your cache layer but may save your database in some cases.

Query rewriting

Let’s imagine this situation - a DBA identified a query which is not optimal and causes significant impact on the database. The query can be easily rewritten but this process requires a code change in the application, and as a result, developers have to be involved, new build has to be prepared, tested and then deployed - all of that has to happen while your databases are on fire. ProxySQL gives you an option to rewrite queries - let’s take a look.

Assume this is our slow query.

SELECT DISTINCT c FROM sbtest16 WHERE id BETWEEN ? AND ?+? ORDER BY c

As you can see, we have a query hitting different tables (sbtest16 is an example here but it uses all 32 tables created by sysbench) and has different BETWEEN arguments. Let’s assume that a correct, more optimal version of this query would be:

SELECT DISTINCT c FROM sbtest16 WHERE id = ?+? ORDER BY c

Of course, this is a completely different query but for the purpose of this post, we’ll pretend it’s our desired query. What can we do? We need to create a rule in mysql_query_rules table with a correct regex to catch the query and a new query version stored in ‘replace_pattern’ column. It’s very important to keep in mind that the match has to be extremely precise - it has to match only the query you intend to match. Be strict with your regex, otherwise you may end up with broken queries.

MySQL [(none)]> INSERT INTO mysql_query_rules (active, match_pattern, replace_pattern, destination_hostgroup, apply) VALUES (1, '^SELECT DISTINCT c FROM sbtest([0-9]{1,2}) WHERE id BETWEEN ([0-9]+) AND ([0-9]+)\+([0-9]+) ORDER BY c$', 'SELECT DISTINCT c FROM sbtest\1 WHERE id = \3 + \4 ORDER BY c', 1, 1);
Query OK, 1 row affected (0.00 sec)

MySQL [(none)]> LOAD MYSQL QUERY RULES TO RUNTIME;
Query OK, 0 rows affected (0.00 sec)

MySQL [(none)]> SELECT rule_id, match_pattern, hits FROM mysql_query_rules LEFT JOIN stats_mysql_query_rules USING (rule_id);
+---------+---------------------------------------------------------------------------------------------------------+-------+
| rule_id | match_pattern                                                                                           | hits  |
+---------+---------------------------------------------------------------------------------------------------------+-------+
| 3       | ^SELECT .* FOR UPDATE                                                                                   | 0     |
| 4       | ^SELECT .*                                                                                              | 21940 |
| 5       | ^SELECT c FROM sbtest[0-9]{1,2} WHERE id=.*                                                             | 15670 |
| 7       | ^SELECT DISTINCT c FROM sbtest([0-9]{1,2}) WHERE id BETWEEN ([0-9]+) AND ([0-9]+)+([0-9]+) ORDER BY c$ | 1568  |
+---------+---------------------------------------------------------------------------------------------------------+-------+
4 rows in set (0.00 sec)

As we can see, the hits counter started to increase which means the query is matching correctly. It doesn’t mean that the rewrite works correctly though. For that, you may want to check ProxySQL’s error log (by default located in /var/lib/proxysql/proxysql.log). You may see entries like this one:

re2/re2.cc:881: invalid rewrite pattern: SELECT DISTINCT c FROM sbtest\1 WHERE id = \3 \+ \4 ORDER BY c

which basically means that the rewrite pattern is not correct and rewrite cannot be executed. In this particular case, an issue was caused by unnecessary escape in ‘\3 \+ \4’ - ‘+’character shouldn’t be escaped here.

Final verification can be done in the ProxySQL’s stats_mysql_query_digest table:

MySQL [(none)]> SELECT hostgroup hg, sum_time, count_star, digest_text FROM stats_mysql_query_digest WHERE digest_text LIKE 'SELECT DISTINCT%' ORDER BY sum_time DESC LIMIT 2;
+----+----------+------------+-----------------------------------------------------------------------+
| hg | sum_time | count_star | digest_text                                                           |
+----+----------+------------+-----------------------------------------------------------------------+
| 1  | 1121190  | 275        | SELECT DISTINCT c FROM sbtest21 WHERE id BETWEEN ? AND ?+? ORDER BY c |
| 1  | 1072667  | 238        | SELECT DISTINCT c FROM sbtest26 WHERE id BETWEEN ? AND ?+? ORDER BY c |
+----+----------+------------+-----------------------------------------------------------------------+
2 rows in set (0.01 sec)

Our SELECT DISTINCT queries have been rewritten. Right now, ProxySQL does not have an option to test your rewrites without modifying live traffic therefore you have to be very cautious when you use it. A way to test rewrites will be added in an upcoming version.
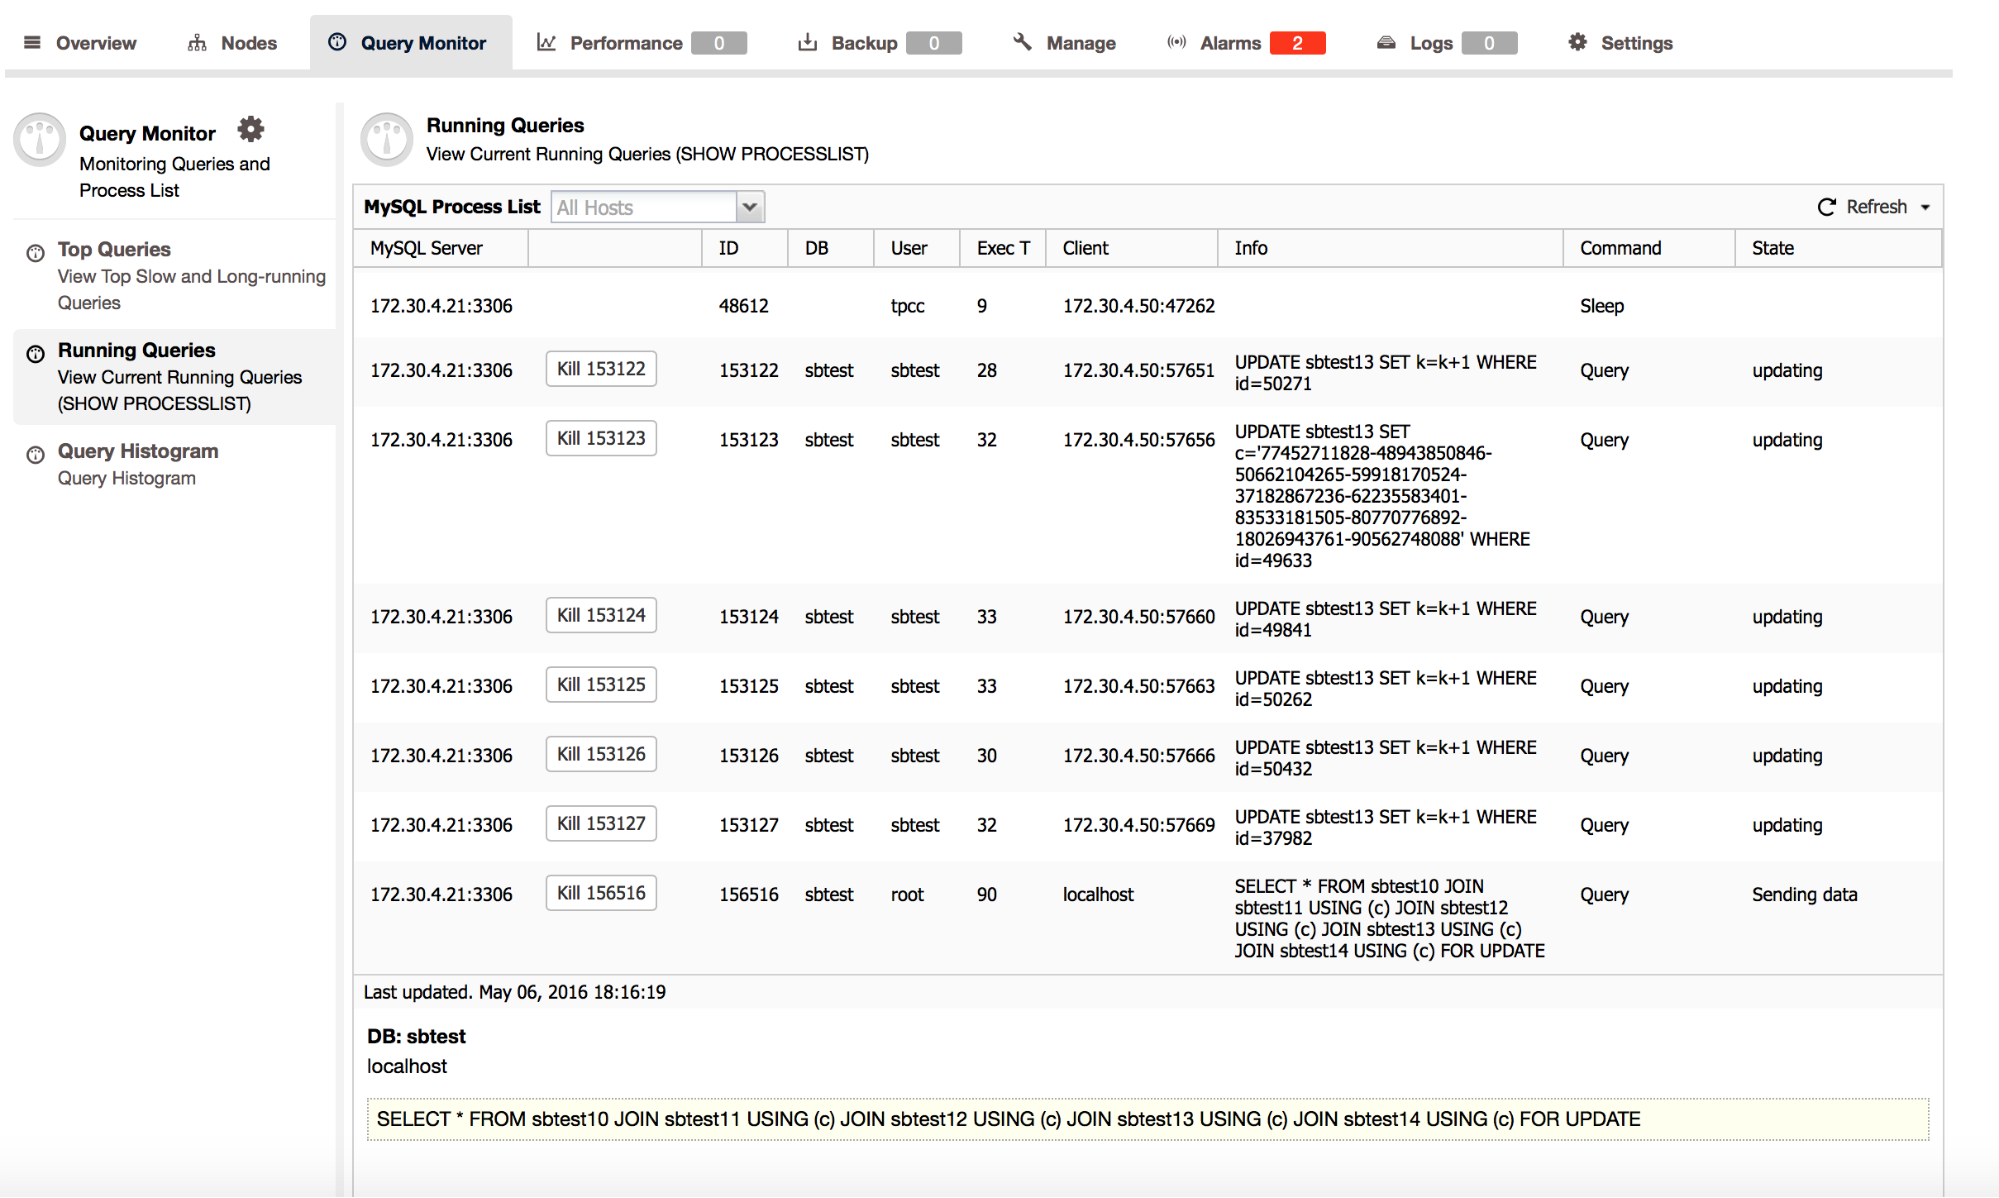
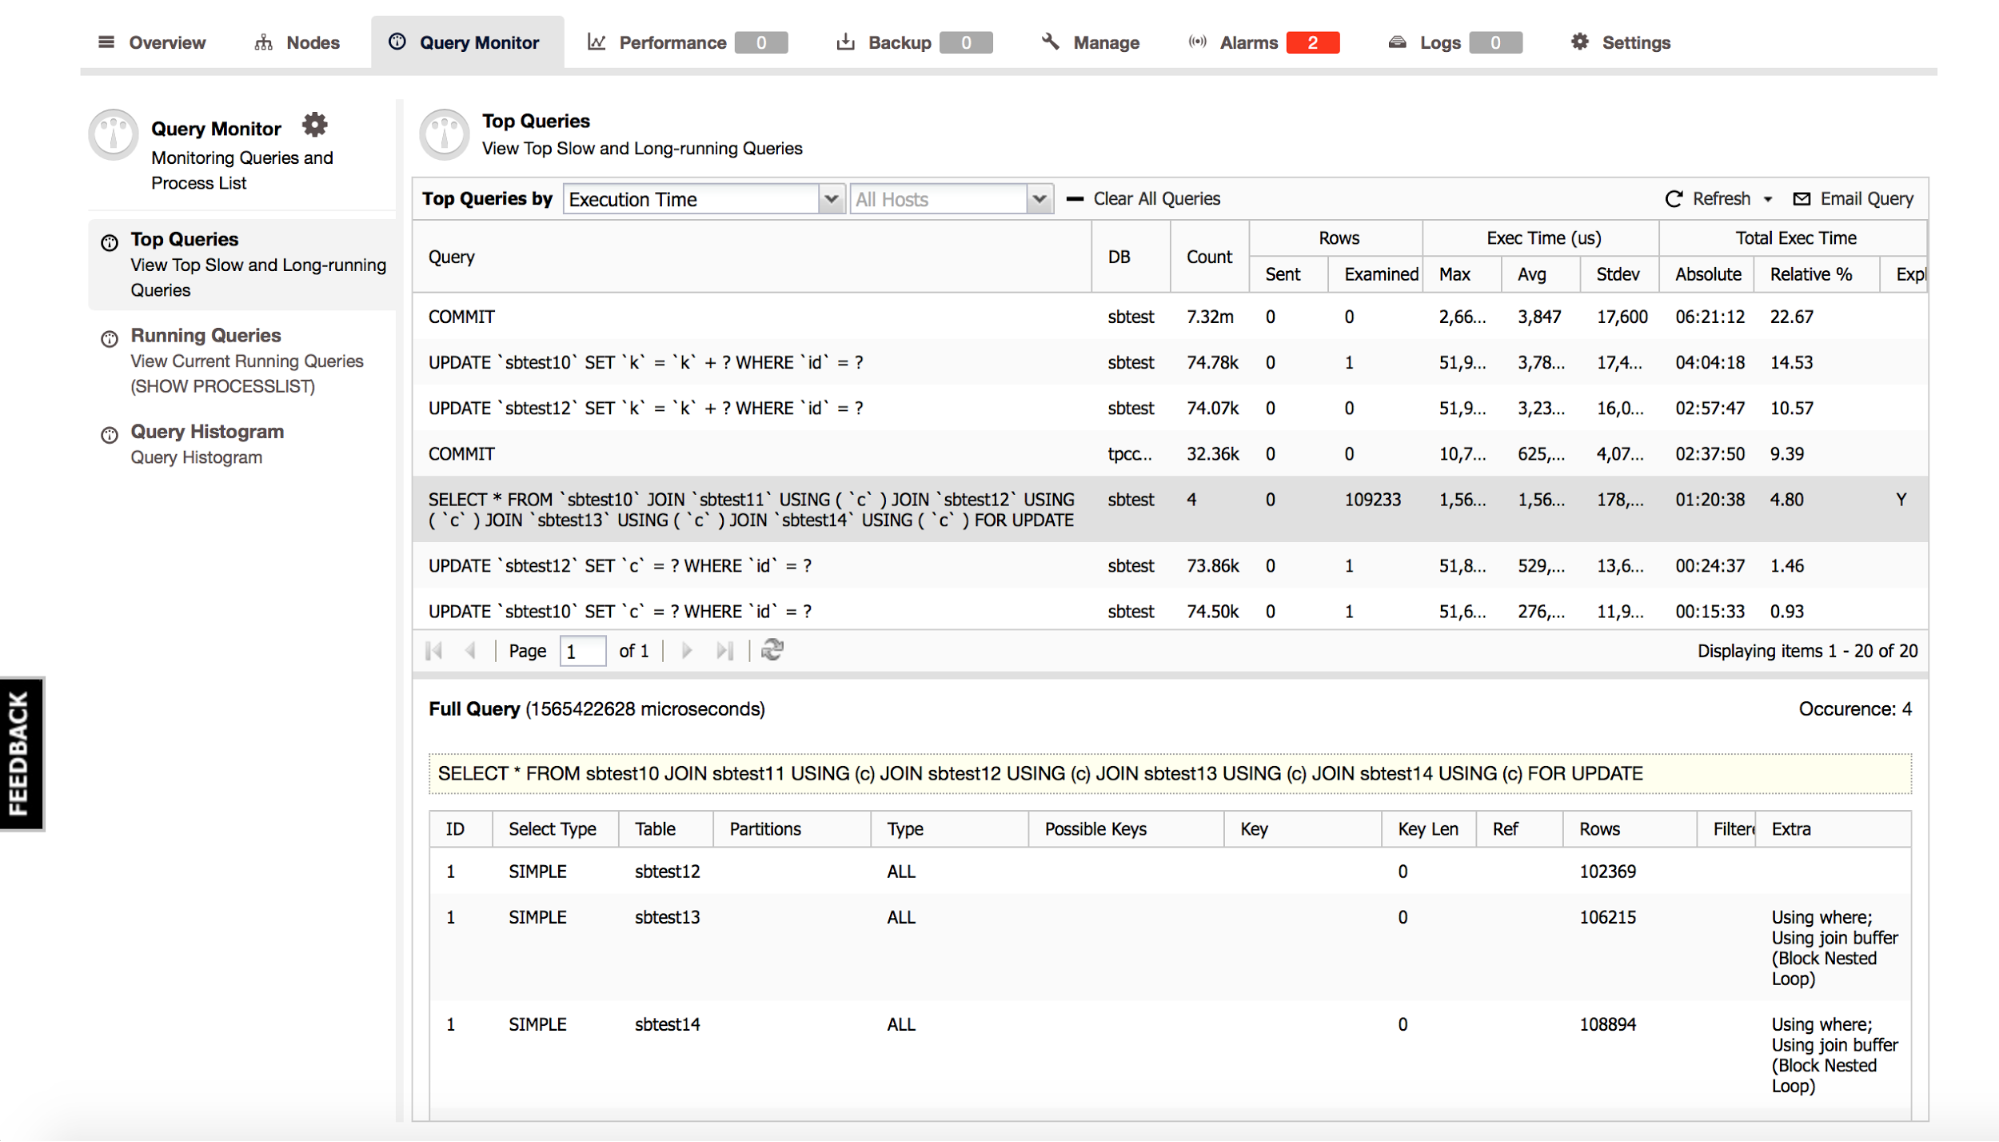
Query statistics

Let’s imagine that, as the DBA, you are trying to understand the workload of the databases. The reasons for this are numerous - you can be a new DBA who’s not familiar with the query mix, you can be investigating different issues around database performance, you can be an external consultant who’s getting up to speed with your customer’s database layer.

All those situations have one thing in common - you want to see what kind of queries your databases are executing. Of course, there are numerous ways to do that - you can collect network data using tcpdump, you can enable slow query log. If you’re sending all of your traffic through the proxy layer, maybe you could use what’s already in place to give you some statistics?

In ProxySQL, there are a couple of tables in ‘stats’ schema which store interesting data. For starters, ‘stats_mysql_commands_counters’ table, which stores information about different types of queries, can be used to get some idea of how fast they are.

MySQL [(none)]> SELECT * FROM stats_mysql_commands_counters WHERE Total_cnt >0;
+---------+---------------+-----------+-----------+-----------+----------+---------+----------+----------+-----------+-----------+--------+--------+---------+----------+
| Command | Total_Time_us | Total_cnt | cnt_100us | cnt_500us | cnt_1ms  | cnt_5ms | cnt_10ms | cnt_50ms | cnt_100ms | cnt_500ms | cnt_1s | cnt_5s | cnt_10s | cnt_INFs |
+---------+---------------+-----------+-----------+-----------+----------+---------+----------+----------+-----------+-----------+--------+--------+---------+----------+
| DELETE  | 11316248971   | 4551565   | 0         | 2907245   | 778419   | 336596  | 207405   | 305059   | 13595     | 2822      | 172    | 252    | 0       | 0        |
| INSERT  | 4590870732    | 4551565   | 2         | 3166500   | 917052   | 354698  | 49826    | 59129    | 3169      | 1103      | 34     | 52     | 0       | 0        |
| SELECT  | 46929819703   | 63722353  | 45467962  | 4358571   | 10661088 | 1401741 | 505177   | 1241246  | 68037     | 17490     | 460    | 580    | 1       | 0        |
| UPDATE  | 25651099588   | 9103156   | 1         | 5328953   | 1800909  | 806071  | 451168   | 675399   | 32361     | 7312      | 416    | 541    | 9       | 16       |
+---------+---------------+-----------+-----------+-----------+----------+---------+----------+----------+-----------+-----------+--------+--------+---------+----------+
4 rows in set (0.00 sec)

Here, we have a nice overview of how fast the different type of queries are. Looking at selects, we can tell that majority of them finish within 1ms, which is pretty ok.

Another interesting table is ‘stats_mysql_query_digest’ which contains information about exact queries. There’s also ‘stats_mysql_query_digest_reset’ table, which, when queried, clears data in the ‘stats_mysql_query_digest’ table - useful to check current data, without any historical information.

MySQL [(none)]> SELECT * FROM stats_mysql_query_digest LIMIT 1;
+-----------+------------+----------+--------------------+-----------------------------------+------------+------------+------------+----------+----------+----------+
| hostgroup | schemaname | username | digest             | digest_text                       | count_star | first_seen | last_seen  | sum_time | min_time | max_time |
+-----------+------------+----------+--------------------+-----------------------------------+------------+------------+------------+----------+----------+----------+
| 1         | sbtest     | sbtest   | 0x2395C0F0FBDF6C6D | SELECT c FROM sbtest30 WHERE id=? | 1289       | 1457954527 | 1457990048 | 2395914  | 304      | 128928   |
+-----------+------------+----------+--------------------+-----------------------------------+------------+------------+------------+----------+----------+----------+
1 row in set (0.01 sec)

Both of those tables give you access to details like the hostgroup where the query was routed, default schema and user which executed the query. There’s also a digest, standardised query format, number of occurrences and couple of statistical data on the query - when it was first and last seen, summary of the execution time, maximum and minimum execution time. Sure, this is by no means data comparable with information you can collect using slowlog or tcpdump and, for example, pt-query-digest. It’s still lot of data which can be useful in building a broader picture of the database workload.

We’ve reached the end of this post, hopefully it gives some insight into how ProxySQL operates and how you can benefit from it. In a future post, we’ll write about how to use ProxySQL with Galera Cluster.

Please take part in our open source database management survey

$
0
0

As members of the open source database users community, it’d be great if you could participate in our open source database deployment and management survey.

Your feedback will help us make our resources and tools for deploying, monitoring, managing and scaling databases of even better use to all. It will give us valuable insight into the challenges you face when operating databases.

Please fill out our survey today by providing your input below; this will take approx. 5 minutes of your time.

We’ll share the results of the survey once we have compiled your responses.

Thank you!

Press Release: Severalnines expands the reach of European scientific discovery

$
0
0

Stockholm, Sweden and anywhere else in the world - 20 April 2016 - Severalnines, the provider of database infrastructure management software, today announced its latest customer, the National Center for Scientific Research (CNRS), which is a subsidiary of the French Ministry of Higher Education and Research.

The CNRS has over 1,100 research units and is home to some of the largest scientific research facilities in the world. It partners with other global institutions and employs over 33,000 people. Working in partnership with universities, laboratories and dedicated scientists, CNRS has delivered advanced research in areas such as obesity, malaria and organic matter in space.

Having an international outreach means they have a dedicated department to handle the information infrastructure of the organisation called the Directorate of Information Systems (CNRS-DSI). Thousands of gigabytes (GB) of administrative data are processed by CNRS-DSI internal systems every week, but with a tight budget CNRS needed software, which was both cost effective whilst delivering a high quality, robust service.

To manage the high volume of data, CNRS deployed over 100 open source LAMP applications. The growth of the institution led to unprecedented usage of CNRS data from tens of thousands of users across the world accessing or transporting information. There was a need to increase the scalability, availability and robustness of the systems.

After launching a study to find a suitable database solution and realising traditional MySQL clusters were too complicated without a database administrator (DBA), they found Severalnines’ ClusterControl in conjunction with MariaDB Galera Cluster, MySQL’s “little sister fork”. ClusterControl offered a comprehensive solution, which is easy to access for all CNRS-DSI technical staff. The solution integrated well across the technological environment and was able to detect anomalies in the system.

Since Severalnines was deployed, the CNRS-DSI team runs a development and a production MariaDB Galera cluster thanks to ClusterControl with future plans to have all of its LAMP applications running in this environment. In fact, CNRS-DSI just recently extended all of its ClusterControl subscriptions.

Furthermore, beside these classical LAMP applications, CNRS-DSI is deploying a cloud storage solution for thousands of its users. For obvious performance and availability reasons, MariaDB Galera has also been chosen as the database component in place of the classical standalone MySQL; and Severalnines ClusterControl has been naturally chosen as the management solution for this critical service as well.

Olivier Lenormand, Technical Manager of CNRS-DSI, stated: “Technology is the backbone of scientific discovery which ultimately leads to human advancement. Data management is very important at CNRS because we want to continue our groundbreaking research and protect our data. Severalnines has helped us keep costs down whilst increasing the potential of our open source systems. We’ve found a database platform, which can both manage and use our LAMP applications, as well as cloud services. Severalnines is helping us enhance the capabilities at CNRS-DSI for the benefit of the global scientific community.”

Vinay Joosery, Severalnines CEO, said: “Data management in a large organisation like CNRS can present technical as well as economical challenges, but it should not get into the way of scientific research. We are really excited we can help CNRS use the best of open source software to increase collaboration in new, potentially life-saving research projects.

About Severalnines

Severalnines provides automation and management software for database clusters. We help companies deploy their databases in any environment, and manage all operational aspects to achieve high-scale availability.

Severalnines' products are used by developers and administrators of all skills levels to provide the full 'deploy, manage, monitor, scale' database cycle, thus freeing them from the complexity and learning curves that are typically associated with highly available database clusters. The company has enabled over 8,000 deployments to date via its ClusterControl solution. Currently counting BT, Orange, Cisco, CNRS, Technicolour, AVG, Ping Identity and Paytrail as customers. Severalnines is a private company headquartered in Stockholm, Sweden with offices in Singapore and Tokyo, Japan. To see who is using Severalnines today visit, http://www.severalnines.com/customers

MySQL Replication failover: MaxScale vs MHA (part 4)

$
0
0

In the earlier blogs in this series, we concluded that MaxScale with MariaDB Replication Manager still has some way to go as a failover solution.

The failover mechanism relied on MariaDB GTID, needed a wrapper script around the decoupled replication manager and had no protection against flapping. Since then, MaxScale and MariaDB Replication Manager (MRM) have received a couple of updates to improve them. For MaxScale, the greatest improvement must be the availability of the community edition repository.

Integration

Previously, to configure MaxScale to execute the MariaDB Replication Manager upon master failure, one would add a wrapper shell script to translate MaxScale’s parameters to the command line options of MRM. This has now been improved, there is no need for the wrapper script anymore. That also means that there is now less chance of parameter mismatch.

The new configuration syntax for MaxScale is now:

[MySQL Monitor]
type=monitor
module=mysqlmon
servers=svr_10101811,svr_10101812,svr_10101813
user=admin
passwd=B4F3CB4FD8132F78DC2994A3C2AC7EC0
monitor_interval=1000
script=script=/usr/local/bin/replication-manager --user root:admin --rpluser repluser:replpass --hosts $INITIATOR,$NODELIST --failover=force --interactive=false --logfile=/var/log/failover.log
events=master_down

Also, to know what happened during the failover, you can read this from the failover log as defined above.

Preferred master

In the second blog post, we mentioned you can’t set candidate masters like you are used to with MHA. Actually, as the author indicated in the comments, this is possible with MRM: by defining the non-candidate masters as servers to be ignored by MRM during slave promotion.

The syntax in the MaxScale configuration would be:

script=script=/usr/local/bin/replication-manager --user root:admin --rpluser repluser:replpass --hosts $INITIATOR,$NODELIST --ignore-servers=’172.16.2.123:3306,172.16.2.126’ --failover=force --interactive=false --logfile=/var/log/failover.log

Flapping

We also concluded the combination of MRM and MaxScale lacks the protection against flapping back and forth between nodes. This is mostly due to the fact that MRM and MaxScale are decoupled, they implement their own topology discovery. After MRM has performed its tasks, it exits. This could lead to an infinite loop where a slave gets promoted, fails due to the increase in load while the old-master becomes  healthy again and is re-promoted.

MRM actually has protection against flapping when used in the so called monitoring mode, where MRM runs as an application. The monitoring mode is an interactive mode where a DBA can either invoke a failover or have this done automatically. With the failover-limit parameter, you can limit the number of failovers before MRM will back off and stop promoting. Naturally this only works because MRM is keeping state in the interactive mode.

It would actually make sense to also add this functionality to the non-interactive mode and somewhere keep the state after the last failover(s). Then MRM would be able to stop performing the failover multiple times within a short timeframe.

Monitoring mode

MRM also features a so called “monitoring” mode where it constantly monitors the topology and could failover automatically if there is a master failure. With MaxScale we always set the mode to “force” to have MRM perform the failover without the need of a confirmation.  The monitoring mode actually invokes interactive mode, so unless you run it in screen, you can’t have MRM run in the background and perform the failover automatically for you.

Conclusion

MariaDB Replication Manager has improved over the past few weeks. With a few improvements, it has become more useful. Seeing the number of issues added (and resolved) indicate people are starting to test/use it. If MariaDB would provide binaries for MRM, the tool could receive wider adoption among the MariaDB users.

ClusterControl Tips & Tricks: MySQL Query Performance Tuning

$
0
0

Bad query performance is the most common problem DBA’s have to deal with. There are numerous ways to collect, process and analyze the data related to query performance - we’ve covered one of the most popular tools, pt-query-digest, in some of our previous blog posts:

Become a MySQL DBA blog series

When you use ClusterControl though, this is not always needed. You can use the data available in ClusterControl to solve your problem. In this blog post, we’ll look into how ClusterControl can help you solve problems related to query performance.

It may happen that a query cannot complete in a timely manner. The query may be stuck due to some locking issues, it may be not optimal or not indexed properly or it may be too heavy to complete in a reasonable amount of time. Keep in mind that a couple of not indexed joins can easily scan billions of rows if you have a large production database. Whatever happened, the query is probably using some of the resources - be it CPU or I/O for a non-optimized query or even just row locks. Those resources are required also for other queries and it may seriously slows things down. One of very simple yet important tasks would be to pinpoint the offending query and stop it.

It is pretty easily done from the ClusterControl interface. Go to the Query Monitor tab -> Running Queries section - you should see an output similar to the screenshot below.

As you can see, we have a pile of queries stuck. Usually the offending query is the one which takes the long time, you might want to kill it. You may also want to investigate it further to make sure you pick the correct one. In our case, we clearly see a SELECT … FOR UPDATE which joins a couple of tables and which is in the ‘Sending data’ state meaning it is processing the data, for last 90 seconds.

Another type of question a DBA may need to answer is - which queries take most time to execute? This is a common question, as such queries may be a low hanging fruit - they may be optimizable, and the more execution time a given query is responsible for in a whole query mix, the larger is the gain from its optimization. It is a simple equation - if a query is responsible for 50% of total execution time, making it 10x faster will give much better result than optimizing a  query which is responsible for just 1% of the total execution time.

ClusterControl can help you answer such questions, but first we need to ensure the Query Monitor is enabled. You can check it in Settings -> Query Monitor Settings, making sure that the Query Sample Time is set to something else than -1.

The Query Monitor in ClusterControl works in two modes, depending on whether you have the Performance Schema available with the required data on the running queries or not. If it is available (and this is true by default in MySQL 5.6 and newer), Performance Schema will be used to collect query data, minimizing the impact on the system. Otherwise, the slow query log will be used and all of the settings visible in the above screenshot are used. Those are pretty well explained in the UI, so there’s no need to do it here. When the Query Monitor uses Performance Schema, those settings are not used (except for Query Sample Time which can be set to -1 to disable data collection).

When you confirmed that the Query Monitor is enabled in ClusterControl, you can go to Query Monitor -> Top Queries, where you’ll be presented with a screen similar to the below:

What you can see here is a list of the most expensive queries (in terms of execution time) that hit our cluster. Each of them has some further details - how many times it was executed, how many rows were examined or sent to the client, how execution time varied, how much time the cluster spent on executing a given type of query. Queries are grouped by query type and schema.

You may be surprised to find out that the main place where execution time is spent is a ‘COMMIT’ query. Actually, this is fairly typical for quick OLTP queries executed on Galera cluster. Committing a transaction is an expensive process because certification has to happen. This leads to COMMIT being one of the most time-consuming queries in the query mix.

When you click on a query, you can see an EXPLAIN output for it - pretty useful to identify if something’s wrong with it. In our example we’ve checked a SELECT … FOR UPDATE with high number of rows examined. As expected, this query is an example of terrible SQL - a JOIN which does not use any index. You can see on the EXPLAIN output that no index is used, not a single one was even considered possible to use. No wonder this query seriously impacted the performance of our cluster.

Another way to get some insight into query performance is to look at Query Monitor -> Query Histogram. This basically is a list of queries whose performance significantly differ from their average.

As you can see in the above screenshot, the first query took 0.0246s (time is shown in microseconds) where average execution time for that query is much lower (0.0008s). We have also some additional statistical info on standard deviation and maximum query execution time. Such list of queries may seem to be not very useful - it’s not really true. When you see a query on this list, it means that something was different from the usual - query did not complete in regular time. It may be an indication of some performance issues on your system and a signal that you should investigate other metrics, and check if anything else happened at that time.

People tend to focus on achieving max performance, forgetting that it is not enough to have high throughput - it also has to be consistent. Users like performance to be stable - you may be able to squeeze more transactions per second from your system but if it means that some transactions will start to stall for seconds, that’s not worth it. Looking at the Query Histogram in ClusterControl helps you identify such consistency issues in your query mix.

Happy query monitoring!

PS.: To get started with ClusterControl, click here!

Viewing all 365 articles
Browse latest View live